
If I took a survey of homeowners and asked them the first word that comes to mind when they think of wallpaper, I’d guess the responses would weigh heavily toward “nightmare,” “outdated” and “tacky.” Many people still think of it as the perm of home decorating – something that seemed like a good idea at the time but that's caused you regret and embarrassment ever since. In case you haven't heard, the tides are turning, y’all…and unlike the “beach wave perm" that inspired false hope of rolling out of bed looking like Kate Hudson, wallpaper’s resurgence is real. You know it’s offish when stores like CB2 and West Elm are selling it in catalogs!
Now that doesn’t mean you should go bananas and wallpaper every room of your house – I hope we at least learned that much from the mistakes of our fathers and their fathers before them (go back and read that in your best Robb Stark voice). There are some places paper just shouldn’t go (steamy bathrooms and greasy kitchens come to mind). And there are some patterns that are better left forgotten. I would be remiss if I didn’t mention that paper is expensive and permanent, so don’t waste it on “meh” looks or in rooms where it will get ruined. And for the commitmentphobes of the world, they offer removable wallpaper now, but it’s still spency as all get out.
When we found our house I knew before moving in that I wanted to wallpaper the powder room. It’s a tiny space to cover, in a room where we don't spend much time (so we wouldn’t get bored in a week), and yet everyone who comes to my house would see it. Yatzhee. It's just the kind of room where a bold pattern could make it really pop. We left the room relatively untouched for five months while we focused on to-do list items that were functional rather than aesthetic. That is, until I saw this giveaway on one of my favorite blogs, House*Tweaking. I threw my hat into the ring and I won (is this real life?!) – $300 to WallpaperDirect! It was pure, dumb, amazing luck and I could not have been more thrilled. The powder room briskly skipped to the front of the line in terms of priorities.
It went from this...


To this...


But let's take a step back...

After finally deciding on a pattern (a nerve-wracking process in itself) we had to figure out how much we needed and how to install it. I used this tutorial as well as some youtube searching to guide the process. Luckily WallpaperDirect also has a very handy calculator to help you determine how much you need, just by measuring the width and height of all the walls you plan to cover and subtracting the width and height of doors and windows. Less lucky was the fact that 3 of our 4 walls had odd angles, and you have to take into account the size of your "pattern repeat." If your wallpaper has any sort of pattern, the repeat is the vertical distance between one point in your pattern and the next identical point. Our paper had a 20" repeat, which I think is pretty big. That means there was bound to be a lot of wasted paper that just wouldn't line up right. We rounded up our calculations when deciding how much to order, because we expected to make a few mistakes in our first rodeo and – let's be honest – because we weren't paying for it. (Thank you, Dana Miller and WallpaperDirect!!)
So let's get down to brass tacks. Here’s what we used:

Prepping the room
The first step was to clear the room of just about everything. The sink, light fixture, socket covers, and vent covers all came down. The toilet stayed, because ain’t nobody got time or space for that. I repaired any holes and dents in the wall with spackle and sandpaper and used a wet sponge to clean all the walls because it’s super important to have a totally smooth, clean surface.
Supply List
• 3 rolls of Mountains by MissPrint
• GH-95 Wallpaper paste for bath & kitchen – $16
• Pasting brush kit – $19.95
• Trough for paste
• Smoother – $2
• Razor or wallpaper knife (in our kit)
• Scissors
• Large, clean, flat table (dining table?)

Getting a level line
The next step is to draw a level line from ceiling to floor. Do NOT use a corner or the ceiling as your guide – there’s almost zero chance that those are actually level (scary, huh?), and what starts as a slight tilt can get out of hand quickly as you add on subsequent rows! I learned from WpD to draw this line about a foot out from the corner, and I used a laser level, though they also suggest a plumb bob.
Once you’ve drawn your line, you have to cut your length and width of paper. If you have enough wall space to fit a full-width strip – great! That’s much easier. In our case, the walls are narrow, so we had to do a lot of cutting to make narrower pieces that would get us to the corner. The factory edge would be the one we used to line up, and the cut edge would eventually be hidden in the corner. More on that later. We measured twice and cut once (except the times we screwed up and had to start over with a new strip), with the help of my man Yasiel Puig. Cut the length a few inches longer than you measured to make sure it will go all the way down the wall. You’ll cut off the excess using a razor once it’s up.

Applying paste
Next, we flipped the paper so the pattern faced down on the table, and we started applying paste with a big paste brush. Two things to note at this step: first, don’t leave any unpasted spots, and second, brush out when pasting the edges. If you drag the brush inward from the edge, excess paste is liable to get scraped onto the front of the paper and leave a stain. To the same end, make sure you aren’t getting paste on the table and then placing your paper on it. We pretty much always slid the paper over to line up with the edge of the table to avoid making a mess. If you do get glue on the front (we did a few times…) just be quick to wipe it off with a clean, wet paper towel before it dries.

Booking time
Then we “book” the paper, which means literally folding the paper up on itself like a book without creasing and letting it sit for 5 minutes or so – we set a timer each round. The moisture from the glue causes the paper to expand – we let that happen during booking so we don't have any surprises after putting it on the wall. Booking also makes it easier to carry the paper over to the wall because there’s less gluey surface exposed, and it buys you some time by slowing the glue's drying process.

Putting it on the wall
After the timer goes off, drape the book over your arm, with the crease facing the ceiling, and carry it to the wall. Peel up the edge of the paper that will go at the top of the wall (in the picture above, that's the left side – determined by your pattern's orientation) and carefully begin to place the first half of your paper onto the wall, lining it up with your level line. Keep the other half of your book folded – it’s easier to line up a shorter piece of paper and it also buys you more time before the glue starts to dry on the bottom half. This was a 2 man job, so no free hands for photo ops – sorry!
We then used a wallpaper smoother to press out air bubbles and affix the paper snugly to the wall. When you find an air bubble you just use the smoother to guide it toward the edge and force it out. It takes a lot of passes to make sure no bubbles are left. At the risk of sounding dumb, make sure your smoother is smooth and clean, so you're not spreading crud all over the place or scratching the paper. And as I mentioned before, the paper is expanded with the glue’s moisture while you’re doing this. As the glue dries, the paper is going to shrink again. If you’ve done it right, it will be snug on the wall and won’t budge at all during drying. But if you leave bubbles and pockets underneath, the paper will pucker and shrivel and look generally awful when it’s dry. That's also why it’s so important to fill in any nail holes and have a smooth wall surface.
(God, my hair looks SO GOOD in these pictures. -___- )


While you’re doing all this smoothing, glue is probably oozing out the sides. Use a clean sponge to wipe away the excess so it doesn’t end up on the front of the paper. Our kitchen sink is a mere 5 feet from the powder room, so it was pretty convenient to rinse the sponge often.
Another fun thing to think about is whether you’re still lined up with your level line (to be clear, by "fun" I mean "super annoying"). There were plenty of times that we got to this point and realized we were no longer lined up. I had to remind Eli a few times the first rule of wallpapering (and DIY in general) – DON’T PANIC. If we got too far off track, we just carefully peeled the paper up from the wall and realigned it. There are a few mulligans to be taken. That being said, you don’t want to do this too many times with the same piece, because you’ve lost paste during the smoothing process and the paper will start drying faster. So – don’t freak out but also don’t take a break for a leisurely stroll around the neighborhood either, y’know? You’ve still got the other end of your book to do.
Once we felt confident in our work up top, we did the same with the lower half. There should be some overhang at the very bottom, because we gave ourselves a grace period (aka a few extra inches). We smooth, smooth smoothed to our heart’s content, and then used a razor blade to carefully cut off the excess along the baseboard.

For the next row of paper, you’ll have to find the point on the paper that will match up with the top edge of the piece you just put up. This is where the pattern repeat comes into play because you'll probably have to lop off the top of your roll to get to the right section and you start collecting 20” pieces of paper that are unusable. Womp womp. Follow all the same previous steps, but when you put this one on the wall you’ll want to line the new edge up very carefully with the pattern on the previous piece. The edges should butt up next to each other without overlapping (what someone with a sense of humor named a "butt joint"). This was one of the trickiest parts – making sure the edges were close enough to appear seamless but not so close that they overlapped – we didn't always get it perfect, but I decided that was fine. I'm firmly in the "no one will ever notice" camp. So if you come over and you do notice it, just pretend you don't, mkay? :)
Corners
When you reach a corner, you want to smooth all the way into it (making a crease) and carry the edge over to the adjoining wall, leaving a couple centimeters of overflow. Then, on the new wall, you’ll line your paper up in the corner (not with the edge you just pasted). This usually meant we had to cut off a vertical slice of the next piece of paper to get to the correct horizontal point in the pattern to match the corner. We tried our best to make the pattern match perfectly from one wall to the next, but perfection is like near impossible – so again, "No One Will Notice."
Sockets, Lightswitches and Vents
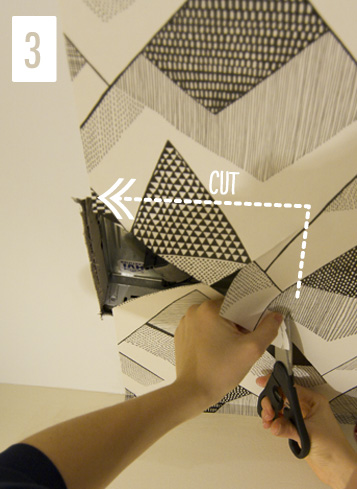
When you reach sockets and vents and other holes in the wall, you smooth the paper over it like it doesn’t exist (being careful not to press too hard when theirs no wall behind the paper). Then you take a razor blade or scissors to pierce the paper in the center of the hole, and cut diagonally toward each of the hole's corners. This gives you 4 triangular flaps that you can then cut off easily around the edges.


Toilets
Doing anything behind a toilet stinks (hah). Luckily the commode in this room is set out a tiny bit from the wall, so I was able to sort of reach my arm behind it to smooth. Once we reached a pipe, we took a careful guess as to where in the pattern the pipe would pop out and then cut in to that spot from the closest edge. The cut gave us two flaps so we could start to position the paper around the pipes, and then we followed the same process we did with the vent of making diagonal relief cuts, this time in a circular pattern instead of square, so the paper could lay flat around the pipe. Once we were around the pipe, we smoothed like normal and matched up the edges we had cut and it’s like it never even happened. Honest to god, I think that pipe just sprouted from the wallpaper naturally. This was another 2-person job with no photos of the process – but look at dem pipes! No seams in sight.

After all the paper was up, we let it dry overnight and then reinstalled the sink and covers for vents, outlets and switches the next day. We did NOT reinstall the mirror and light fixture because both were ugly and I didn't want to drill holes in our new wallpaper for things I planned to replace. It took some time to find something I liked better, but that's a whole 'nother post.
This project was by no means simple– It took us a few solid days, as well as a good bit of brain power and patience. BUT, I'm glad we did it ourselves and anyone who really wants to do it could. It was so rewarding to see each subsequent row go up and the room get closer and closer to finished. Plus, after dealing with all the challenges of a tiny under-the-stairs bathroom, now we could wallpaper a regular ol' wall in our sleep (don't tell Eli I said that).
Let's take another look at that after photo :)


Ahh.... much nicer. Every time I open the door my heart squeals with joy. Thank you again, Dana Miller of House*Tweaking and the generous folks at WallpaperDirect, for making my half-baked idea possible. And thanks to Eli for doing half the work :D
So, what do you say? Who wants to put up wallpaper now?
Disclaimer: This tutorial is not error proof and is simply what worked for us. Please do additional research and take precaution when embarking on your own wallpapering adventure! Little House Big City cannot be held responsible for your safety or the outcome of your home improvement projects.