Tackling a New Space: Nick's House

masculine-living-room-1.jpg

More lighting | Window Treatments | Coffee Table | Bigger Rug | Media Stand | Accent Chair | Fun pillows | Credenza – IKEA BESTA, I think | Party Seating

You know the folks you see on HouseHunters who insist they need a huge open space to entertain all their many friends? And you (the person binging on HouseHunters and oreos alone on the couch) can’t help but think, Who ARE these people with so many “friends” and so many “parties” to attend? If I didn’t know better, I’d think they were making it all up to look cool on national television. But I do know better, because I know Nick. He’s our friend who enlisted me to decorate his place in DC, and I’m convinced he has a close personal friend in the city for every single person I interact with in a three-month period, including cashiers, bus drivers and security guards. He’s just a magnetic, likable, interesting guy. He throws dinner parties and happy hours like nobody’s business, but his place really hasn't been living up to his standards as the ultimate entertaining space. To be frank, he was starting to get a little self-conscious about being a real-life adult who invited other real-life adults to come over for dinner at his bachelor pad that looked fresh out of college. He’s at the point in life where he wants his home to feel grown-up and settled, and he really wants it to serve as a welcoming and comfortable space for entertaining. 

Nick's living room before

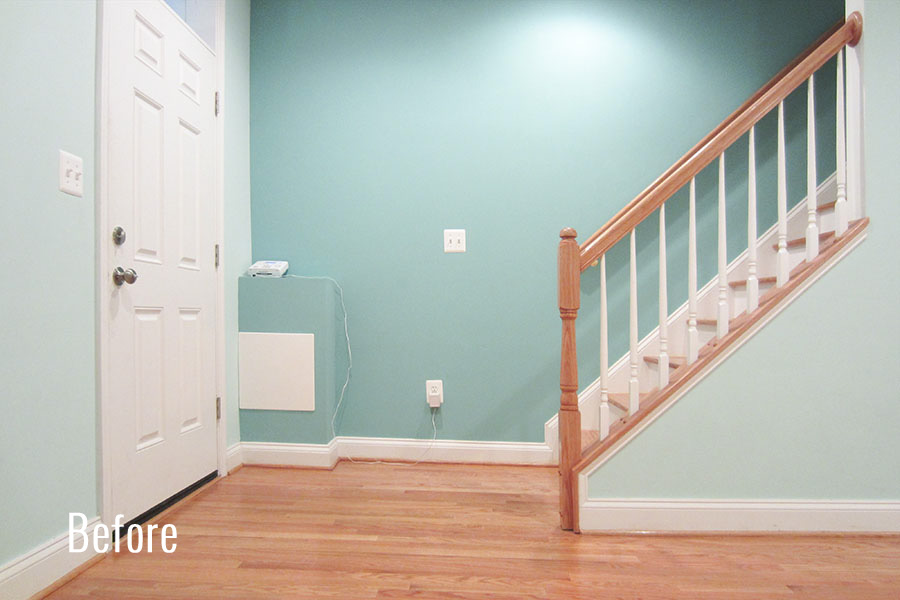
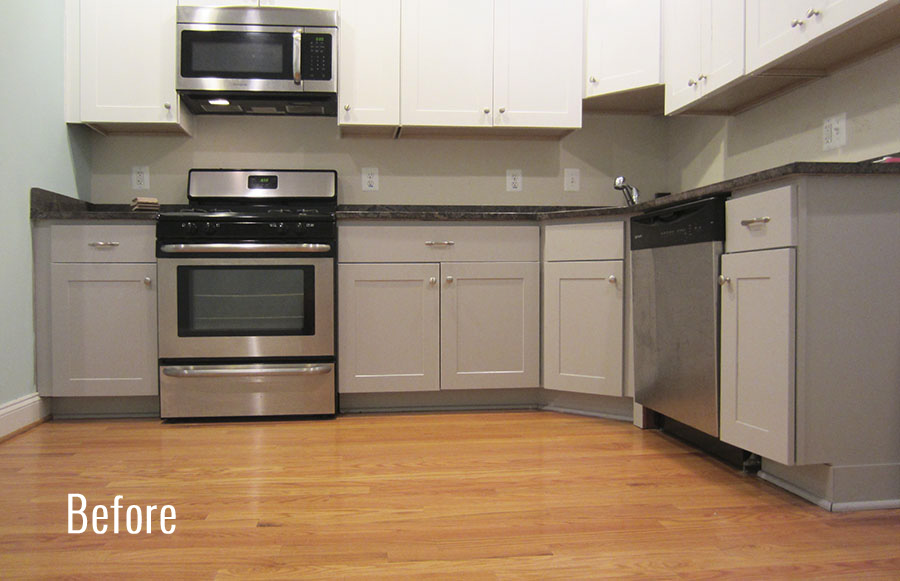
Nick's place is d-rippppping in potential, so when he asked for my help I couldn’t say yes fast enough. It’s HUGE by city standards, with an open floor plan, gobs (I mean GOBS) of natural light, and a landlord who is game to make some improvements. That’s right – landlord, we’ll call him LL for short. This is a rental, which means the sky is not the limit, but I’m excited to see (and show) what’s possible without going overboard. The LL has agreed to replace the shabby broken window blinds with some roman shades I picked out, paint the (water-damaged) walls a color he agrees to, and even make some big (low-cost) improvements in the kitchen (hint: the top cabinets are falling off the walls). I’m not sure how Nick got him to agree to all that – he should probably get a diplomatic medal of honor. My guess is it has something to do with him being a dream tenant for the last 5 years and his not planning on leaving anytime soon.

That said, most of Nick’s own money in the space should go toward things he can take with him. He has most of the big pieces already – a versatile sofa he purchased last year, an extendable dining table, a credenza, and a TV. Everything else is fair game.

The first thing on the chopping block is the rug. The current 4 x 6 shag was a quick buy on Amazon, and it’s about a third of the size this room needs. We’re upgrading to a 9 x 12, which is big enough for each end of the sectional to get a leg on. I considered going even bigger than that, but there's a small step up from the living to dining room that cuts the floor space at an angle. A 9 x 12 would usually cost an arm, a leg and a firstborn, but RugsUSA is almost always running a 75% off deal that makes it way more reasonable. Since we’re going safe on the wall color (remember LL is making the final call), and given that the sofa is a huge swath of gray, I picked out this blue-and-white moroccan shag to bring in some color and personality. I’ll carry the blues around the room with pillows, vases and artwork, and inject some organic energy into the space with house plants. 

Nick's living room before

Second order of bidness: seating. Nick needs the kind that’s always available (like a cute, new accent chair), as well as the kind that can be stashed out of the way during business hours. I’m a fan of the Oswald tufted slipper chair from West Elm – it’s low-profile, reasonably comfortable and the frame gives it just a little touch of quirk. For stashable seating, I opted for the Terje folding chairs from Ikea – they’re affordable, easy to find if we need more, and they’re wooden. They feel sturdier than plastic folding chairs and classier than your basic metal option, plus they’re more comfortable than a backless stool. (You know you’re a grown-up when back support factors into your design) The Terje’s back has a convenient hole for hanging, so rather than take up precious closet space, we’re gonna keep them on the inset wall by the juliet balcony – out of the way but within arm’s reach. Here's a 3D rendering I built of the space so you can see what I'm talking about: 

Rendering of Nick's place

Rendering of Nick's place

The new coffee table will follow the same ethos – there when you need it, gone when you don’t. Nick loves having the ottoman in front of the couch for vegging out – because who wouldn't? –but he could really use more surfaces for guests to set down drinks and plates when he’s puttin' on the ritz. In addition to some side tables and trays, I think he could benefit from a fold-away coffee table like the one I have, where the top lifts off and the legs fold together so you can stash it when you need the floor. Then when you need a coffee table you just holler, "Annie, get the legs!" and BAM. Coffee table at your service. 

Perhaps most important for a good party (or life) is lighting! This apartment has more windows than I thought possible on a row house. It’s amazing during the day – the light streams in from all directions – but it’s seriously lacking at night. No dinner party (or room, for that matter) should be without mood lighting, y’all! Nick has a couple lamps but they're the kind that feel like they might collapse at any moment. So we’re bringing in some funky plug-in sconces, table lamps, and a big pendant over the dining table to get the party started. 

Nick's dining room before

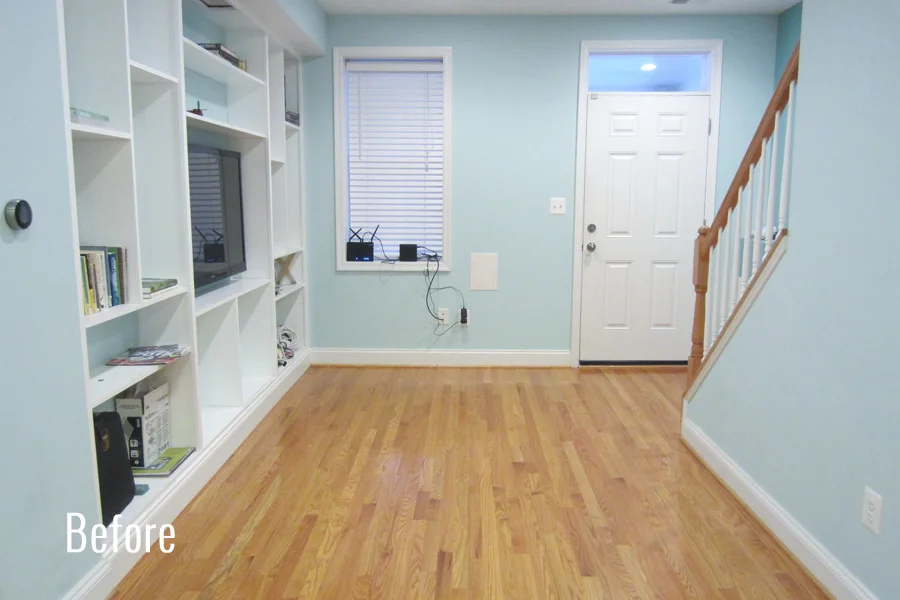
Speaking of the dining table – it’s usually used as a desk like you see up there, and then Nick moves the computer when he's having people over. I want to change that. The thing is, this table is basically the first thing you see when you come up the stairs from the front door, and I can’t help but think it must be a wee-bit demoralizing to finish working a 12-hour day, climb 40 stairs up to your apartment and then immediately be greeted by more work you could be doing. No thanks! Instead, I want the table to be a nice focal point that says, “Hooray! You made it! You’re home! Dinner is on its way! Make yourself comfortable!” Y’know? So I’m banishing the iMac from the table and creating an office nook where the Billy bookcase is now.

Nick's living room before

The desk isn't on the mood board, but I'm looking at this one from CB2 or perhaps blinging out a modular closet like Dabito did here.  I want something wall-mounted to optimize the space and with shelves overhead so we don't lose the storage. What doesn't fit on the new shelves will go inside the existing credenza, which we're relocating to live by the balcony (see below).

Rendering of Nick's place

Rendering of Nick's place

Currently it's hiding between the back of the sofa and the table and it's taking up space where we could be seating people around the table. The sofa looks super low-profile in the photo below, but that's actually where the step is that I mentioned earlier. The floor of the dining space is a few inches higher and we don't want anyone falling off the ledge when they go to stand up from the table, alas, the credenza must move. It will have a much happier life by the balcony where he'll serve as the drink station and be the most popular guy at the party. 

Nick's living room before

The last big item I want to replace is the TV stand. It’s tough to make a TV look nice, but a sharper, brighter media stand with some closed storage would certainly help. The current stand is the same color and width as the TV, making it an even bigger eyesore. I want to get a stand like the Stockholm from Ikea, which would fill out that space better while still being low-profile and visually light. In case you’re wondering how practical it is to put your cable box behind a door, allow me to introduce you to the narrow band antenna. You can hide your cable box and eat it too! Uhhhh… I mean you don’t have to be able to point the remote or even see the cable box to be able to control it with an antenna like this. Forget Ryan Gosling, THIS is God’s gift to women. ;)

Nick's living room before

Blasphemy aside, I'm VERY excited to see this living/dining situation come together. It's been really refreshing to work on someone else's house and get out of my own head about my house. In addition to the living room, I'm also working on the kitchen and if all goes well with those we may tackle the bedroom too. I’ve spent enough time blabbering already, so I’ll save the kitchen for a different post.

What have you guys been up to? Any updates that made all the difference in your rental?

How to Float Mount Pictures in a Frame

How to float mount pictures in a frame, via Little House Big City

If you asked me what’s the 1 thing I’m most embarrassed about when guests come over, I’d say it's a tie between my junk-filled guest room and the number of naked walls begging for some personality. I mentioned back in October that I’m being incredibly picky about what I put on my walls now that I own a house. In previous apartments, whatever I could find for less than $30 at Homegoods would do, whereas now I want pieces that are more meaningful to me.

Last christmas my little sister gave me this print from Rifle Paper Co. that I adore because it reminds me of my favorite time of year in the city AND because I continue to nurse a sick obsession with all things RPC. It only took me two months to get this print up on the wall, which has gotta be a new record. 

How to float mount pictures in a frame, via Little House Big City

Matting and framing can be an intimidating and expensive process – as in I almost spent $100 to get a pale pink mat cut for my 16 x 20 image. Thxbutnothx. Then I got wise and did it myself for 10 bucks (thank you, self, for giving me such a good deal). I decided to float my print instead of going with a traditional mat because it feels fresh and unexpected, plus it's a heck of a lot easier to do in my very humble opinion. A float mount is when the image looks like it's hovering on top of your mat rather than peaking through a window. It's ideal when your artwork goes to the edge of the paper or when you've got a nice textured edge. My print fit neither of those scenarios, but I do what I want! We'll all float on alright, Already... 

Supplies:

Step 1: Cut the mat board to the size of the frame

How to float mount pictures in a frame, via Little House Big City

Making sure I was working on a totally clean surface, I laid the mat board face down and marked my cuts using the back of my frame. Then I held my straightedge firmly on the line and followed it with a box-cutter. Mat board is surprisingly sturdy and it took me a couple attempts to figure out that I really needed a brand new blade, and I needed to press down pretty hard. It's also a good idea to have something tough underneath to protect your table... (whoops)

Step 2: Mark where you want the picture to go

How to float mount pictures in a frame, via Little House Big City

I centered my picture on the mat board (still face down), eyeballing the position, then checking with a measuring tape before tracing the top corners.

Step 3: Cut a slit a little narrower than the picture

How to float mount pictures in a frame, via Little House Big City

Once I knew where the top of my picture would be, I cut a slit about an inch lower than that and about two inches narrower than the width (an inch from either side)...that way the cut will be totally hidden once the picture is in place. 

Step 4: Apply hinging tape to the back of the picture

How to float mount pictures in a frame, via Little House Big City

How many types of tape does one world need?! Gummed hinging tape! Never thought I'd buy something so specific, but this stuff is used to preserve the sanctity of all that is holy in your artwork/photo/certificate/whatever. It's actually very nice because it holds well but can easily be removed later. The specific variety I used is great for heavier weights of paper, but I'm not sure how it does with thinner stuff.

I tore off two 2.5" pieces and sprinkled a little water on the tips. I gave it a couple minutes for the water to activate the tape's gumminess and then stuck'em to the back of my picture....but just the tip! The box says not to adhere more than a quarter inch of the tape to the artwork itself. I placed my tape about an inch from the top of the picture and a few inches in from the sides. 

Step 5: Slide tape through the slit and secure on the back

How to float mount pictures in a frame, via Little House Big City

Once the tape dried I slid the flaps through the slit on the front of my mat. Because I placed the tape away from my picture's edges, I had some leverage to adjust its final position. That was helpful because I didn't trust my slit to be level or perfectly centered.

How to float mount pictures in a frame, via Little House Big City

Once I was happy with the placement I carefully flipped the mat board & art over onto a clean (!) surface and secured the tape. If you don't want to risk messing anything up you could also slide it over to the edge of the table face up and finish taping from below. I carefully wet the remaining flaps of tape, let them gum up, and secured them to the back of the mat board. Then I tore new pieces of tape, gummed'em, and placed across the originals to form a T. This is called a T-hinge – go figure! The pros recommend it because it secures the artwork from the top while letting the bottom hang free. Fun fact of the day: Art breaths... it needs air circulation and space to expand and contract when the humidity and temperature changes in your house. Who knew?! 

Step 6: Frame the picture and add spacers

How to float mount pictures in a frame, via Little House Big City

That's a cross-section view of my frame. Speaking of breathing, I added spacers so the print wouldn't be pressed against the glass. Don't suffocate your art, people! A traditional mat does a good enough job at this, but with a float mount the picture is vulnerable! It needs a spacer to step in and tell that glass to back the heck off. I used some round plastic bumpers that I'd picked up for our kitchen cabinets... you know the nubbins that keep the doors from banging every time they shut? I cut about a quarter off the top so they'd fit and then pressed the sticky side against the inside edge of the frame. I put them at the corners and the midpoints to keep the mat pushed back, and they're hidden behind the front lip of the frame.

Step 7: Marvel at your cleverness

How to float mount pictures in a frame, via Little House Big City

OoooOOooOooOOooOOoo .... it's floating! And if you noticed there's no glass in that frame, fear not. I removed it for the pictures to nix the glare and reflection, but it's going back in tonight :) To be sure, this is just one way to float. Another way is to mount the picture on foam core for a more pronounced look, but I preferred a more subtle (read: simpler) approach for this particular print.  

How to float mount pictures in a frame, via Little House Big City

The finished project has me grinning ear to ear! I love the print, and how the pale pink mat and rose gold frame play on the cherry blossoms. Thanks to my sister for this beautiful present – my walls are a little less naked! Now if only we could fast-forward to May and take a boat out on the Tidal Basin.  

Gallery wall sources clockwise from left: stormtroopers photo by Joe Shymanski | Washington D.C.  from Rifle Paper Co. | reindeer from Homegoods | Painting by Paul Olsen | Black & white horizon photo by Steven L. Miller | Color horizon photo by Eli | Eli self portraits 

New "Grayown" Floors in Da House

I can't really put into words how excited I am about what just happened here, so I'l have to settle for this: 

EEEEEEEEEEEEEEEEEEEEEEEEEEEEEEE!!!!!!!!

That's pretty much what Eli and I have been doing since we got home on Thursday night to see our new floors – except in sock feet, obvi! The last 18 months felt like an eternity of waiting to banish the yellow-orange basketball court that was our hardwoods. Dramatic? Yes. But they were so pervasive and affected how I felt about everything else in the house. Having them refinished feels like this huge weight was lifted off my shoulders, and suddenly I feel reinvigorated and excited about the future!

Who knows how much longer I would have put this off if it weren't for you guys helping me decide on a color – so THANK YOU! After we went through that whole process of voting and photoshopping in different options, I was really nervous that I wouldn't be able to translate "grayown" into a real life stain. I dunno about you guys, but I think I got pretty darn close! Let's look at some before and afters, shall we? First stop: the living room! 

Goodbye, Barf Simpson... 

The living room with natural oak floors

Hellooo, Grrrayown 

Our floors after 2 coats of stain
Our entryway and stairs with natural oak floors
stairwell-floors-after.jpg

When I got the quote for the floors, I didn't realize the newel posts and handrail aren't automatically calculated into the cost. I could have paid extra for them to be refinished, but I figured why pay more when that’s something I can handle myself? I know what I'll be doing this weekend! Just follow my lead and ignore them for now.

The main floor with natural oak floors
The kitchen after two coats of stain on the floors

I really love how the color works with the kitchen cabinets we painted back in July. The view down there on the left was the biggest eyesore in the house – I was so elated when we finished painting the cabinets and then so bummed when we pulled up the tarp covering the floors. Without all that shiny orange screaming "LOOK AT ME!" I can fully appreciate our handiwork 4 months later. Plus, I finally feel inspired to install the backsplash and under-cabinet lighting. 

The kitchen with natural oak floors that clashed with the gray cabinets
Our kitchen after 2 coats of fresh stain on the floors

The powder room already won the distinct honor of being the first complete room in the house, but today it's looking even better. The previous yellow matched the suns in the wallpaper spot on ... that was definitely not what I was going for! Now this little room feels calmer and more grown-up. It’s still quirky but it doesn’t look like a funhouse or a tanning booth anymore.

The powder room with natural oak floors
The powder room with 2 coats of stain on the floors

Below is the view from the master bedroom. I like seeing this first thing in the morning to remind me that it wasn't a dream – the floors really are refinished :] Those newel posts are mocking me but their days are numbered, and the walls are begging me to hang artwork ASAP.

The hallway with natural oak floors
The upstairs hallway after 2 coats of stain on the floors

The darker wood just feels so luxurious... like my feet are getting a little treat every time they touch the floor. Have I mentioned that I love it? I really love it. I chose to go with a satin finish on our redo and I'm so happy with the result. It has this coy sheen that is so beautiful in person.

Close up of the floors before
Close up of the floors after refinishing them. They're a mix of Coffee Brown from DuraSeal and Classic Gray by Minwax.

Okay, so that's enough of the ogling for now. Keep reading if you want to know about the process or cost of getting from A to B. Last week went something like this:

  • Sunday (Prep): Eli and I moved our couches, dining table and refrigerator into the laundry room alongside the washer and dryer...our pack-job would get a very high Tetris score. The breakfast nook in the laundry room went up to the guest room, along with the rug and anything else that was breakable. We cleared the kitchen counters and took artwork down from the walls so they wouldn't get covered in dust...the TV stayed up because it's anchored really tightly on the wall and could be covered with plastic. 
  • Monday (Day 1): I met the 3 floor guys in the morning to let them in and finalize the color. (Word of caution: make sure you specify if you think you want gray, black or white stain as those aren't standard colors that they keep in the truck) They removed the shoe moulding and taped up plastic around anything we wanted to keep dust free (like the kitchen cabinets/counters, built-ins and TV). Then they sanded a section of the floors to put down color swatches. I had picked up a floor sample from Home Depot in the color that I liked  (Colfax by TrafficMaster), which made it easier for the guys to match. After we decided on the color, they sanded the entire floor and applied the first coat of stain.
The floor company put a few swatches on the floor so I could settle on a final color.
  • Tuesday (Day 2): In the morning I went by the house to make sure the color was good before they started applying the poly. It was lighter than we'd decided on, so I asked them to apply a second coat of stain. That added about $0.75 per sq ft to the final bill, but I'm really glad we did it.
The floors with 1 coat of stain
The difference of 2 coats versus 1 was subtle, but definitely richer
  • Wednesday (Day 3): The guys applied the first and second coats of poly. I opted for a water-based polyurethane in a satin finish because it dries fast and clear. If we had gone with an oil poly, the floors would have needed a full day between each coat and then more curing time after. Plus the house would have been filled with noxious fumes and the color would have gotten more yellow over time. Oil is the classic standard, but water-based just sounded more appealing to me. Word of caution: My friend Sharon had a bad experience with water-based poly which she later learned was caused by using Murphy's Oil Soap (CORRECTION: An earlier version of this post said it was Mrs. Meyer's hardwood floor cleaner – it's actually Murphy's! My B, Mrs. M). Apparently something about the cleaner interfered with the adherence of a water-based finish... super crazy and unfortunate! I almost never mop and certainly never with Mrs. Meyers, so I decided it was a non-issue for us. I'll let you know how it holds up! 
  • Thursday (Day 4): The guys applied the third (& final) coat of poly in the morning and installed new shoe moulding. We got home from work around 9pm and did our celebration dance on our new floor!
  • Weekend work: I'll be sanding & staining the newel post and handrails this weekend, as well as touching up the paint on our stair risers and caulking the new shoe moulding. Then we'll move everything back to where it belongs and share more "After" photos.

Eli and I stayed with my sister during the refinishing process...technically we could have been back in the house after the first 2 coats of poly went down, but we played it safe and waited til it was all done. One thing I was really nervous about going into the process, was security. There would be strangers in my house when I wasn't home, which is nerve-wracking for me. The guys we hired were fine and didn't give us any reason to suspect they'd steal anything (before, during or after), but we did take some precautions. Eli took his expensive camera gear to his office and we kept our laptops with us. Everything else stayed, including the TV, iMac, jewelry, etc. but other than the TV, we didn't leave anything enticing out in the open. 

The other concern was what to do with our house key. It wasn't practical for us to meet them every time they came or went because of city traffic and needing to be at work. I ended up leaving them my key, which was nerve-wracking again...what if they made copies? Or what if they forgot to lock up and someone else broke into our house? These are things I have to think about in our neighborhood where there's a decent amount of crime. Luckily we have a home security system that we can control from our phones and see whenever a door or window is opened. The floor guys called me each morning when they arrived so I could disarm the house, and then again when they left so I could arm it again. I also let my neighbors know what was going on so they could call the cops if anything seemed awry. Thankfully we didn't have any issues, but I just wanted to share what worked for us since I hadn't really considered it beforehand.

Lastly, the bill. I called around and got some quotes before deciding to go with a local company called Atlas Floors. Here's how the bill broke down:

Sand, 1 coat of stain, 3 coats of poly for main floors (309 sq.ft.) $927.00
Sand, 1 coat of stain, 3 coats of poly for stair treads (103 sq.ft.) $154.50
2nd coat of stain (309 sq.ft.) $231.75
Discount** -$100.00
Total cost $1,813.25
** I originally chose Atlas because my friend had recommended them and they were offering an Angie's List Deal. After I had them come out to measure and finalize the quote, I learned that it was a different company called Atlas that was offering the deal. Whoops. They offered me $100 discount to stick with them, and I took it. I'm still not sure which company my friend used, but it worked out in the end.

$1,800 is easily the most we've spent on anything in our house to date, but it also has had the biggest impact. I'm considering it an early birthday and Christmas present to myself. : ] And an investment in my sanity! 

So what do you guys think? Did it turn out like you expected?