
I hope y'all are having a crazy fun holiday! (or recovering from all the excitement if it's now Monday) Last week I shared how I built a knock-off West Elm headboard and I didn't even mention my bed's fancy new earrings. The nerve!
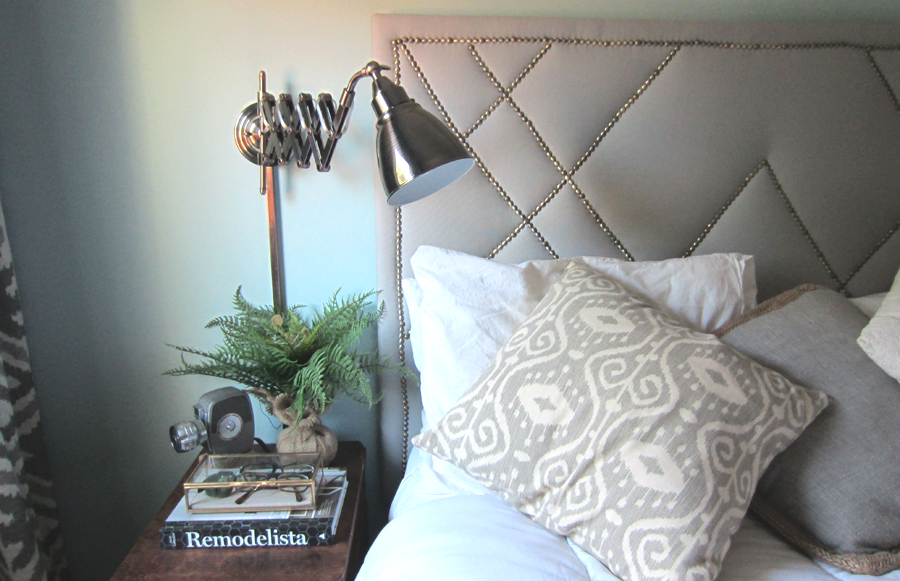
They’re new, made by Kenroy Home, and I’m so happy they’re here. Especially since this is what we were rockin' before:

Those mismatched lamps have been traveling with me from apartment to apartment since college, but their ramblin’ days are over. And that white conehead on the right is a sunrise simulator to peel me out of bed in the dark winter mornings. Thank God it's now summer, the sun is shining, that ugly monstrosity is stashed out of sight, and I got me some bedside bling!

Bedside sconces are a great option for small bedrooms because they don't take up any real estate. They're like a top-notch waiter at a really nice restaurant – so good you almost forget they're there (except magically your water glass is full, the crumbs on the table have disappeared, and you feel like royalty). Yes, sconces are just like that. If you don't have space for a big nightstand (or any nightstand at all), you can hang a stylish light fixture and save room for other nighttime necessities. No fumbling under a big lamp shade to turn them on and off, either – just function and polish.
Speaking of lampshades and polish, I picked up this pro-tip from Emily Henderson when E & I were working on set for the Suite Style Contest: fabric shades are preferable to metal ones in the bedroom because they diffuse light for a relaxing ambience, whereas metal creates a very directional light that's better for reading. By this time my light fixtures had already been sitting in my living room for, oh, 2 months. No matter. It makes total sense and you can put that tip to good use but it was too late for me – I'm a lost cause who is (gratefully) still happy with my metal accordion lights. Here are some other sconces I was considering:

1. West Elm Accordion | 2. Etsy Brass Scissor Sconce | 3. West Elm Lens Sconce | 4. Crate & Barrel Jax White Sconce | 5. Vivianne Gold Brass | 6. Addison Pharmacy Swing Arm Lamp
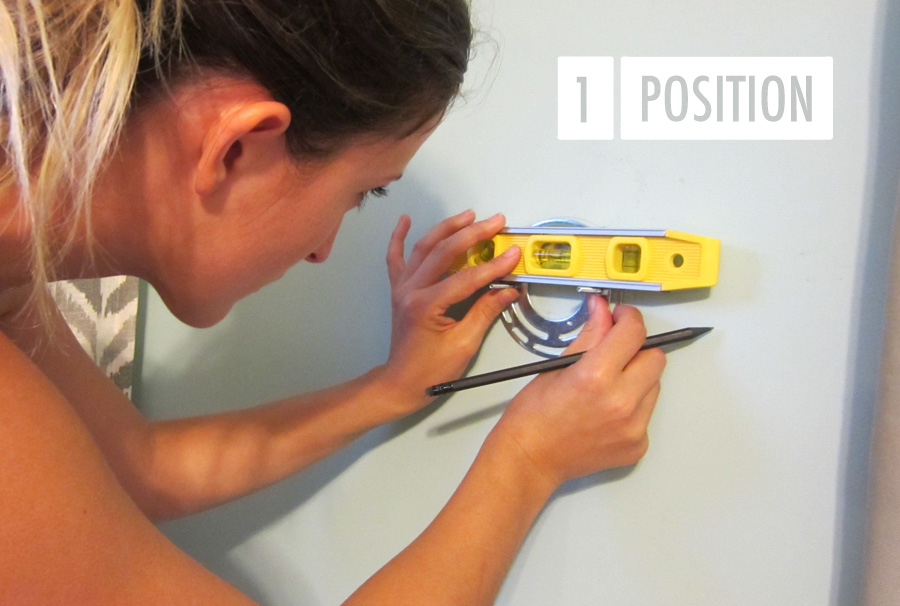
Installing these lights was a super quick update – we knocked it out in less than an hour and still had time to catch the season finale of GOT before bed. There are just four steps: Position, Secure, Cover and Plug.
1. Position that puppy
We decided where we wanted them by taking turns holding them up on the wall. Very scientific – I know. They needed to be high enough to provide some reading light, easy to reach from bed, and centered over our nightstands. Once we found the spot, I marked it on the wall with a pencil and we moved on to step 2.
2. Secure it to the wall
The mounting hardware included with our light was a circular plate with two screws. I positioned it so the screws would be level and marked the holes we'd need to drill. The headboard was hogging all the studs, so we had to use drywall anchors for these guys. We drilled pilot holes, placed the anchors and came back with the wood screws included in the packaging. Before tightening them down all the way, we busted out the level again to check our work. The mounting plate gave us some wiggle room to adjust once the screws were in – love good product design. Then we tightened down the screws, slide the fixture onto the plate, and fastened it with two ball bearings.

3. Cut Cover the cord
There's nothing like a jankity plastic cord to ruin a good thing. Our sconces came with cord covers (not all do), which are essentially two tunnel-like strips that fit together like a Russian doll. One piece attaches to the wall, the cord lays inside the tunnel, and the second piece slides over the first to hide it all. You can always pick these up at Lowes or Home Depot for a couple bucks if they didn’t come with your light, and I imagine you could spray paint them to mimic whatever finish you’ve got goin’ on. To make sure these were perpendicular to the nightstand, parallel to the headboard, and centered under the light, we enclosed the cord with the two covers before attaching anything to the wall. Then we got the level out again and did all of our positioning & marking before drilling any holes. Once we had our mark, we removed the front cover, moved the cord aside and screwed the base in. Tada.

4. Light it up!
We have a conveniently located outlet behind the bed, which was already home to a power strip for plugging in our phones. We added these guys to the electrical party and shared an epic, across-the-bed, slow-motion hi-five. BAM!
Going to bed feels so much more luxurious when you're not banging your shins on the corner of the bedframe.
