
Happy Monday, folks! My most sincere apologies for missing Friday. The week was cray – news was breaking at work, my computer was breaking at home – it was brutal. My hard drive crashed, and it would have been complete devastation if not for Eli, my man of many talents who spent many hours salvaging my files (and forced me to backup in recent months). Watching him do surgery on my computer is a thing of beauty (think computer innards exposed, tiny screws everywhere, miniature screwdriver in hand). So here we are... Monday... perhaps the worst day of the week. Let's hope I can cheer you up with a fun and simple DIY!
Two months after sharing my wallpapering adventure, the powder room is STILL UNFINISHED. It's missing two things which are so small and at the same time so important: a hand towel rack/soap holder combo and a stylish stool (more like a miniature side table) on which to set extra toilet tissue for guests, and (perhaps more importantly) add a little styling je ne sais quoi in the room. I had a very specific image in my head of what the stool should look like but after months of looking I concluded it does not exist in the correct dimensions and price range, and so begins a game I will henceforth refer to as Low Cost & Found. It's bascially the MacGyver of DIY, in which I pilfer odds and ends from around the house, pick up some cheap supplies at the hardware store, and put them all together.
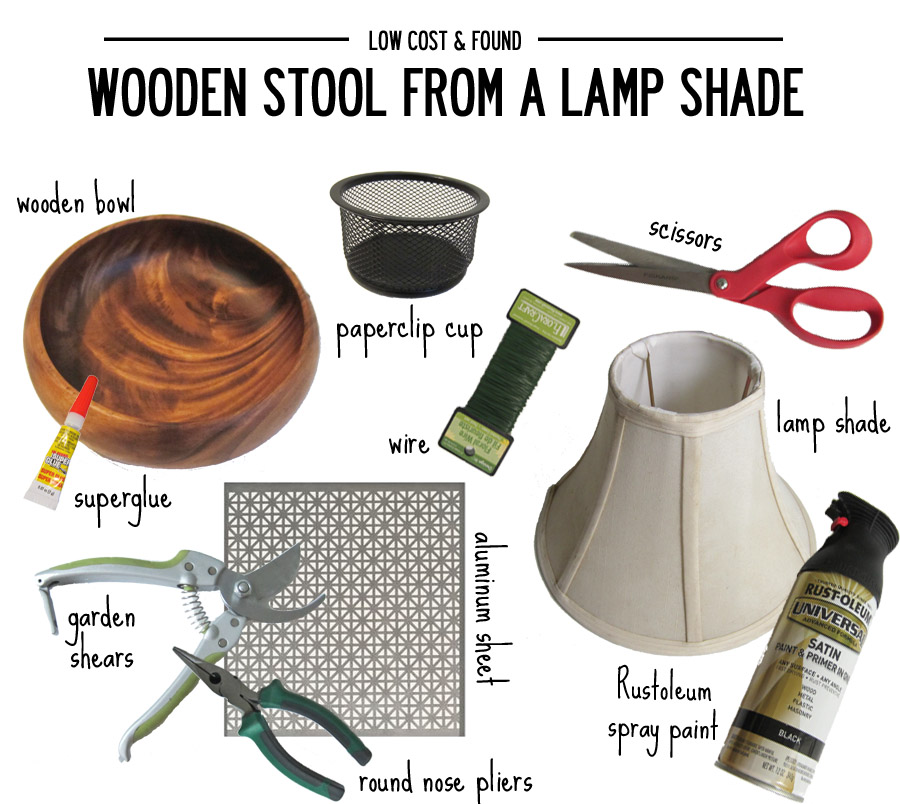
In this case, I had a beautiful wooden bowl from Homegoods ($14), a small lampshade that was about 6 inches tall and 4 inches wide across the top (you can find them at Goodwill for $1), a metal cup for holding paper clips, a Union Jack-patterned aluminum sheet ($10 at Home Depot, and enough for several projects), and some 22-gauge floral wire that was laying around the house. With the help of some cutting & bending apparatuses, some spray paint and super glue I made this... no power tools necessary.
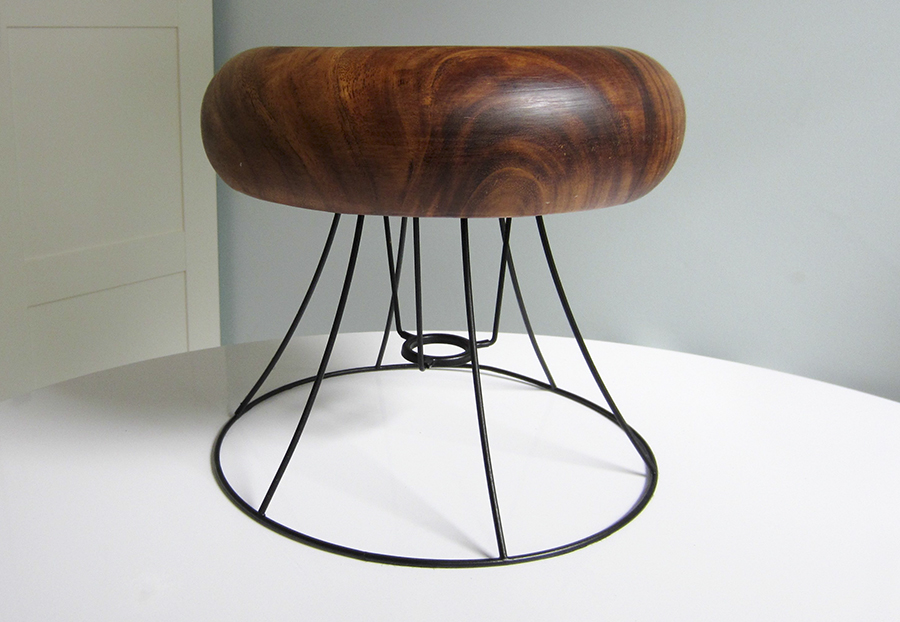
It's business up top and party on the bottom. I wouldn't stand on it – nor should you or your kiddies (it ain't made for that) – but for a pint-sized decorative stool, he's pretty cute.
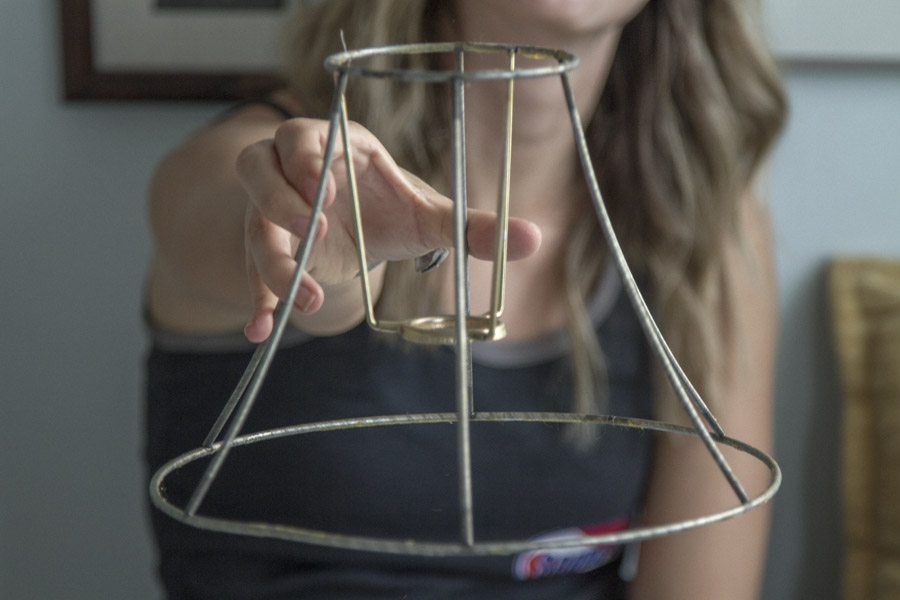
The first step in making it is to free the wire-framed lampshade from its dingy cloth cocoon. I removed it with scissors and then scraped off some really lovely, yellowed glue with my nails and a wet paper towel. I’m not sure whether these old metal frames contain lead (?), so if you do this at home take proper precautions.


After cleaning the frame, I applied a thin coat of Rustoleum spray paint in a matte black. It’s paint & primer in one and is well-suited for metal. I let it dry outside for a couple hours.

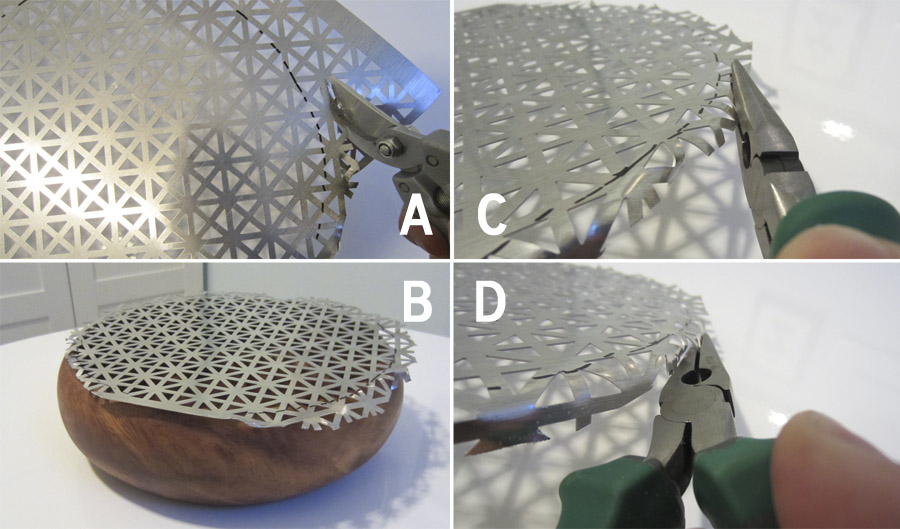
While the spray paint was drying, I marked the outline of the wooden bowl's rim on the aluminum sheet and cut around the circle with my gardening shears (err i mean, metal snippers... don't tell the gardening police). Then I used round-nosed pliers to roll the sharp edges down...giving the circle a curved edge that will fit nicely inside the bowl. I tested to see if the aluminum would fit inside the bowl as I went along, and stopped bending it when it could sit level about an inch below the outer rim. I decided to spray paint this aluminum black, but the silver would have been a fun look, too.
I used a tape measure and Sharpie to mark the center of the bowl, applied a big glob of superglue, and then carefully placed the paperclip cup on my mark, dead-center. I piled on some books and heavy objects to weight it down and let it dry for an hour or so. The bowl had a nice flat bottom, so the cup was able to sit totally flat and level.

This step was only necessary because the depth of my bowl and short stature of my lamp shade meant that my overturned bowl would cover half the shade when stacked on top. Goodbye, lovely curves! It's all about size ratios here and while the stool needed to be short, I didn't want it to look squat. I considered other options besides the bowl – for instance, if I used a round butcher block cutting board instead I could have just screwed it onto the base with some metal braces and called it a day. Unfortunately for me, I really fell for this bowl and decided it was worth the extra effort. So here we are with a total MacGyver move – supergluing a paperclip cup to make the bowl shallower, and hence saving the lampshade from being swallowed up when I stack them together later. Think of it as the bowl's booster seat. :)

While the cup and bowl were getting to know each other, I also applied a thin line of superglue around the top rung of the lamp shade and centered the aluminum sheet circle on top with the curled, jagged ends facing up. This time I used a jar full o' rocks to weight it down and dry, since a book would have gotten glued thru the cutouts in the aluminum. After it dried, I came back with some floral wire, threading it through the cut-outs and around the lamp shade's top rung to make doubly sure the two were secured. I then applied another thin coat of spray paint to the underside of the stool – covering the silver aluminum and green floral wire to get a cohesive matte black.


I used my pliers to twist the wire super tight... that baby was goin' no where. Make sure your aluminum circle is centered and level over the shade, because the paperclip cup and bowl are going to rest on top of it to make the top of the stool.

The last step is to attach the base and the bowl. I applied a last strip of superglue around the edge of the paperclip cup and carefully fit the bowl over the aluminum sheet, pressing down firmly when it was centered and level.

Then I came back with some more wire to thread through the aluminum cut outs and the little holes in the paperclip cup. This was a little tricky (and perhaps not totally essential) because the holes in the cup weren't all that visible behind the aluminum sheet, and they were small to begin with. I used the wire like a fish hook and fumbled around a little til I got it through a hole. Then I twisted the ends tightly, snipped 'em close to the base, and used a Sharpie to color them black. Ooo, tricky, trick-ay.

And there you have it, folks! An adorable little stool made almost entirely from stuff I found or picked up on the cheap. Look how perfectly it presents the spare TP!

Sure, there aren't any small animals in the house to appreciate the cuteness of the underside, but I'm always prepared...just in case.

The wallpaper is so bright and whimsical (which I'm still lovin', BTW) so the dark, rich wood helps to ground it with a level of seriousness, while the curvy bowl and wire base fits in with the playful nature of the room.

I'm so relieved that I can stop searching for tiny stools to fit in my tiny bathroom! Now I just need somewhere to hang that stinkin' hand towel! My combo soap holder/towel rack may turn into another game of Low Cost & Found, since I can't for the life of me find what I'm looking for.

What did you guys get into over the weekend? And fun low cost & founds of your own? Hopefully no computer crashes...