
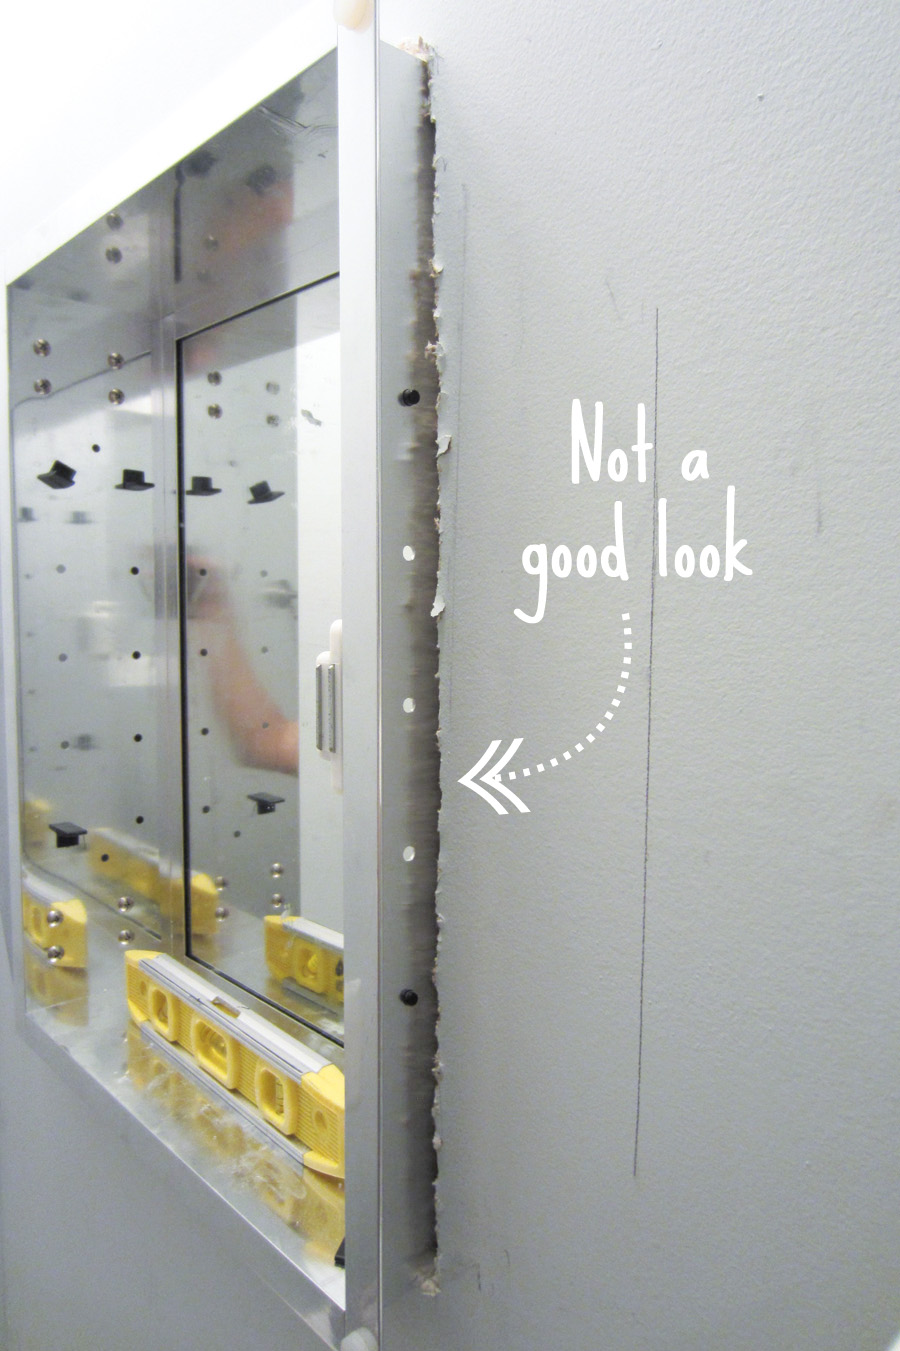
Last weekend I finally worked up the courage to install the medicine cabinet that's been sitting on top of the dryer for about a year. I was so excited to score it for $25 at Second Look Consignment – less excited about cutting a big hole in the drywall to install it. I could have mounted it on the wall, but a mirror jutting out 4 inches from the wall felt like an invasion of the little space we have. I put it off for a long time for fear of what lies beyond the wall (GoT, anyone?). There could be any number of things: pipes, wires, electrical boxes, or wall studs to name a few. I finally faced the uncertainty last week, and it turns out reality is stranger than fiction.

I discovered a secret window. Apparently when the extension on our house was built, no one bothered to remove the original window…or the blinds... or the Christmas bow from 1949 (actual year unknown). I was sawing away at the drywall and discovered it while Eli watched World War Z on surround sound downstairs – so I was pretty sure I'd just unearthed a portal for the undead. My only defense was the saw in my hand, but it's been a week and I still have a heartbeat, so I think we're in the clear. Any zombie-like resemblance or behavior can be blamed on a lack of sleep and dehydration ; ]
For about a second I considered opening the adjoining wall in the bedroom so we'd have a window and natural light in the bathroom, but then I regained my sanity. Clearly no good could come from a drive-thru window to the loo. If only I'd found something more useful – like a wall of gold bars or a suitcase full o' cash! The last person who lived in this house grew up in the Great Depression, so there's still hope.
According to a This Old House tutorial I read, installing a medicine cabinet should be a pretty straightforward process. In my case it was what I like to call "an opportunity for creativity." The window wasn't going anywhere easily, and its rock-solid frame was butting into the space we needed for the cabinet. Let's say it together, "Bummerrrr."
I'm getting ahead of myself, though. Let's go back to the beginning, so I can show you the whole process from soup to nuts. Rest assured, this story has a happy ending.


I started by measuring the back of the cabinet, which would need to slide into the wall ( 12" x 16" x 4" ), and then I used a measuring tape and laser level to mark the position so it was centered over the faucet. I had Eli hold the cabinet up to the wall so we could determine a height that worked for both of us. It turns out our happy place is about 11 inches between the bottom of the mirror and the countertop.
Once we had our placement drawn on the wall with a pencil, I used a studfinder to mark wall studs in the vicinity. This is the point at which I rejoiced because – YAY – the studs were perfectly centered around the faucet! I should be able to slide the cabinet in between them easy peasy. Ha ha, joke was on me. You know what they say: if it seems too good to be true, it probably is. See my reflection in the hole below? Let's call that foreshadowing.


I used a jabsaw to carefully cut a 4" x 4" hole within my mark to do some reconnaissance. This Old House recommends driving a long screw thru the drywall to use as a handle for pulling it out once it's cut, which I thought was pretty clever idea. I did my best not to jab beyond the drywall (since I didn't know what was back there), and then I used a flashlight to look for pipes, wires or electrical boxes. Finding none of those things, I cut over to my actual mark and made my way around the larger rectangle. Clearly visible was the glint of glass, but I was too intrigued to turn back now!
This is where things got hairy. While I was busy laughing about the window (or zombie portal...?), the lil Christmas bow, and how lucky we got with the studs, Eli was keenly noticing the issue with the window frame. Typically, studs are 2" wide and 4" deep, so it makes sense that medicine cabinets are 4" deep to take full advantage of that space in the wall. In our case, the stud on the left was rotated because the window frame was all up in its grill, making the stud only 2 inches deep. Including the drywall, we had about 2.5 inches of usable space for our 4-inch deep medicine cabinet. Ughhhh.

We had a few options. We could have slid the whole mirror to the right of the window frame, but that would make our mirror off-center and we'd have to cut the stud on the right. We also could have stuffed our valuables into the wall, re-attached the original mirror, and pretended like nothing ever happened ("What hole in the wall? ... Oh you mean our safe!") I didn't like either of those options, so I decided to build a new wooden frame around the outside of the hole that would make up the 1.5 inches we lost.
But first, I had to add 2 x 4s at the top and bottom of the space to support the cabinet. I cut them down to size and secured each piece one at a time. I lined it up to be flush with the opening and drove 1.5 inch drywall screws thru the wall and into the wood. Then I pre-drilled a hole going through the new wood and the original stud at a 45-degree angle and followed up with 2.5" decking screws. I secured each block to the left & right wall studs, so those suckers are SECURE.


In a perfect scenario, we could have slid the cabinet in at this point, driven a few screws through the sides and called it a day. Alas, the window necessitated a few extra steps before any days could be called. Next up: building the outer frame. The edges would be visible when the cabinet was open (or by looking at it from the toilet...but why?), so I went with select pine board with nicely finished sides...none of that knotty bizness. I picked up a 6 foot piece of 1" x 2" select pine board (measures 0.75 in x 1.75 in) and cut it into 4 pieces to make up the frame. We used a triangle and 1" screws to fasten the sides together at right angles.


Next we had to attach the frame to the wall. We lined it up with the hole and checked to see that it was level before we pre-drilled thru the frame, thru the drywall and into the studs. The drill started making awful screaching sounds, which we learned is the sound of wood rubbing against wood. To make it stop, we had to pull the drill out every so often and clear the bit of wood before going in for more. We used a countersinking drill bit so that our screws wouldn't stick out on the face of the frame. Each time we drilled a hole we came back with a 3" wood screw, and continued like this every 4 inches or so around the perimeter (the photo above is before we had all our screws in). Then I used wood filler to cover up the screws. Below you can see the difference between a basic pre-drilled hole and a countersunk hole.


While the wood filler was drying, I applied a waterproof, paintable, silicon caulk along all the seams. When caulking, I lay down a thin line of the stuff and then drag my finger down the edge to smooth it out. I let everything dry overnight and then applied two coats of paint the next day to match the walls. In a previous post (or two??) I said the color in the bathroom was Drizzle by Sherwin Williams. That's wrong. It's actually Sparkling Spring by Behr (730E-2) – my bad!
After the paint dried, the frame looked like an extension of the wall. Obviously the mirror wouldn't be flush like I'd hoped, but a 1.75" bump-out is much more palatable than a 4" bump-out (had we just mounted it on the wall).
We removed the mirror to make it easier to install the cabinet and then used four 1.5" screws & four 3/4" screws to secure it in place. Why the different lengths? I'm glad you asked. The holes closest to the back lead to wall studs and the holes in the front lead to the new wooden frame. I used longer screws in the back for extra security and shorter screws up front so they wouldn't poke through the outside of the frame. Once the screws were in, I gave it a few hard yanks to make sure it wasn't going anywhere, and then reattached the mirror. Tada! ... Almost ...


There was still one minor detail: shelves. I didn’t notice they were missing until very far along in the process – not that I would have cared since I got the cabinet for such a steal. Luckily the nubbins for holding shelves were still there, so I just had to make something to rest on them. I decided on glass, cuz I was feelin' classy & dangerous.
I picked up a piece of replacement glass & a 3-piece glass-cutting kit from the hardware store. I measured the distance between the shelf-holders on the left & right, and the distance from the back of the cabinet to the front. Then I followed another This Old House tutorial to make the cuts. In short, you mark your cut, tape down a straight edge along your mark, and use your cutting tool to score the glass in one fell swoop. Then you tap the back of the glass behind the line you scored until you hear it *crack* and then slide it over to the edge and *snap* it. If you want to try it out I fully recommend watching the TOH tutorial for further deets and safety precautions (like wearing gloves on both hands the whole time...tsk tsk).


The glass shelves are now in and lookin' sharp (literally and figuratively). Eli has voiced apprehension about his big paws getting sliced, so we'll see how long they last. I haven't had an issue, but it's a valid concern that I think can be addressed by adding a thick line of clear caulk to the edges – to be continued. It feels great to get the toothbrushes and toothpaste off the counter, and my contact case and floss have happily relocated from the metal bowl over the toilet. The "after" shot below was my debut in Real People, Fake Arms. At least now I know I've got a fall-back career modeling for mannequin arm makers.

At the outset, I guessed this project would take less than 2 hours. HA! That was a gross underestimation. The window really threw me off, and it wasn't until the end that I realized the shelves were missing, so I had to make a few surprise trips to the hardware store. We had the cabinet duct taped up for about a week (as seen on instagram), but I'd estimate the actual project time was more like 6 hours (drying wood filler and paint included). That said, the whole project cost less than $50 and the bathroom definitely looks & works better – so it was totally worth it! Hopefully I didn't scare you out of installing one of your own. Plus, who knows? Maybe you'll find a fortune in your walls instead of a stinkin' Christmas bow.
There are just a few things left to do in the "master" bathroom now. I still need to pick out a new light fixture & a paint color for the vanity, and I want to swap the door swinging into the room for a sliding barn door. Upgrading the mirror and getting stuff off our small counter sure feels good, though!

I hope you all have a fab holiday weekend! Is anyone tackling a project they've put off for too long? I'm hoping we can stain our deck and get some pool time before summer abandons us.