Simple Faucet Fix That Saved Us $600 in Plumbing

Simple faucet fix that saved us $600

That sounds like the subject line of a spam email if I’ve ever seen one, but I swear it’s true! Back on the eve of Christmas Eve, Eli discovered water spilling out of the cabinet under the kitchen sink and onto our beautiful new floors...cue panic. Santa must have known this was *just* what we hoped for the night before we left town. There was no time to fix it, so we turned off the water supplies (to the sink and to the rest of the house), and we hoped for the best. When I got home about a week later, I found a plumber thru Angie's List who didn't charge the usual $75 or $100 to come give an estimate, and I thought, "Cha-ching!" In hindsight, this might have been a red flag. 

The plumber turned the water on aaaaand....nothing. No leak. Isn't that how it always goes? You've got a problem until you're standing in front of someone who can actually fix it? Ugh. After almost an hour of him "looking," I pulled a "mind if I take a peek?" and literally found the water in 30 seconds. Granted it wasn't a lot of water like it had been the week before, but I should have known at that point that he was a crappy plumber (pun intended). Regardless, I just wanted him to fix the sink so I could get the kitchen back to normal... that was until he said it would cost $630. *record player screech* Say whaat?!

He said we'd have to replace the faucet, and his quote included $255 for the one in his truck (not a great price, but whatever) and $375 FOR LABOR. Now, I'm no plumbing expert, but that sounded really high. Why so much for a simple faucet swap?

Simple faucet fix that saved us $600

Well, he complained a whole lot about our little corner sink and insisted on removing the garbage disposal to reach the faucet behind it and then reinstalling the disposal. No disrespect, but this sounded like a personal problem to me. A more nimble person could probably get in there fine without removing the disposal and inflating the price... like Eli nimble... 

(Please ignore the messy counters...leaky sink)

(Please ignore the messy counters...leaky sink)

I told the plumber, "thanks but no thanks," and that I would shop around for a cheaper, nicer-looking faucet. I mean honestly, if I have to replace a faucet that never bothered me to begin with, it sure as haayyyyl better be a stylin' upgrade! Plus, the leak had dissipated for whatever reason, so it didn't really qualify as an "emergency" anymore and could wait for Eli to take a look.

Now, let me stop for a moment to clarify – I'm not suggesting every plumbing problem is a DIY or that plumbers aren't worth the money they cost. We hired a plumber the first month we lived here because water was leaking from the upstairs shower and coming through the recessed lighting in the kitchen. We paid a little more than $400 for a plumber to fix it, and it was money well-spent. What I AM saying is to trust your gut. If a plumber can't show you the problem and explain exactly what is causing the leak, or he gives an estimate that seems disproportionate to the size of the problem, OR you have nothing to lose by tinkering on your own, then you may want to consider telling that plumber to bugger off. You can call another one to get a second opinion or try to fix it yourself... we chose the latter and thank god we did. It was ridiculously simple AND free! Here's how Eli fixed it.

Step 1: Follow the water to find the source

The plumber guessed the leak was coming from a plastic piece that was not sold separately, thus the need for a new faucet. He was wrong. Eli keenly noticed a dark ring on the underside of the granite counters that looked a lot like water  – an indication that the problem was likely above the sink. Smarty pants. We had often noticed water around the faucet while doing dishes but assumed it was just from splashing. Not so! Upon closer look, Eli found some leakage at the seam where the handle rotates. Ding, ding, ding, ding, ding!

Simple faucet fix that saved us $600

Step 2: Turn off the water

Before we started dismantling the faucet we had to turn off the water using the knob under the sink. For a brief moment we considered skipping this step and transforming the kitchen into a slip'n slide. Maybe next time... ;)

Simple faucet fix that saved us $600

Step 3: Remove hot-cold indicator

Our faucet doesn't have any branding or insignia so I can't tell you with certainty who made it, but to disassemble it we first had to pry off the little indicator that says which way is hot and which way is cold. A flat screwdriver did the trick without scratching the finish.

Simple faucet fix that saved us $600

Step 4: Remove the handle

Eli used an allen wrench to loosen a set screw the lives inside that hole. Then he removed the handle and the cap it rests on.

Simple faucet fix that saved us $600

Step 5: Loosen retainer nut

He used a vice grip to unscrew the gold retainer nut, but a big adjustable wrench would have been better. The vice grip can easily chew up the threading, so he had to be careful with that. 

Simple faucet fix that saved us $600

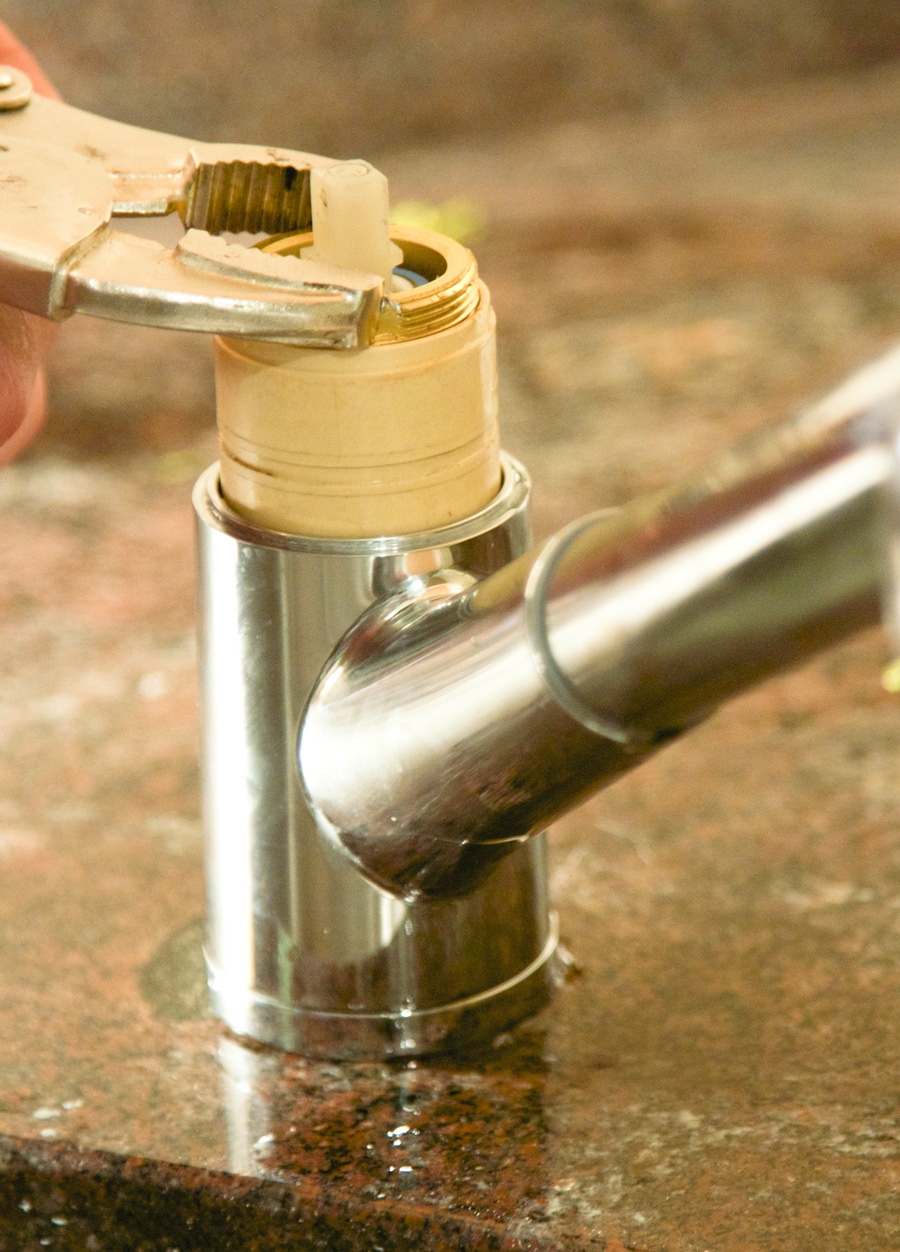
The gold retainer nut is what holds the blue hot-cold cartridge in place. The cartridge is where hot water is mixed with cold to give you whatever temperature you're going for. We knew NONE OF THIS before taking everything apart – sinks are fascinating! 

Simple faucet fix that saved us $600

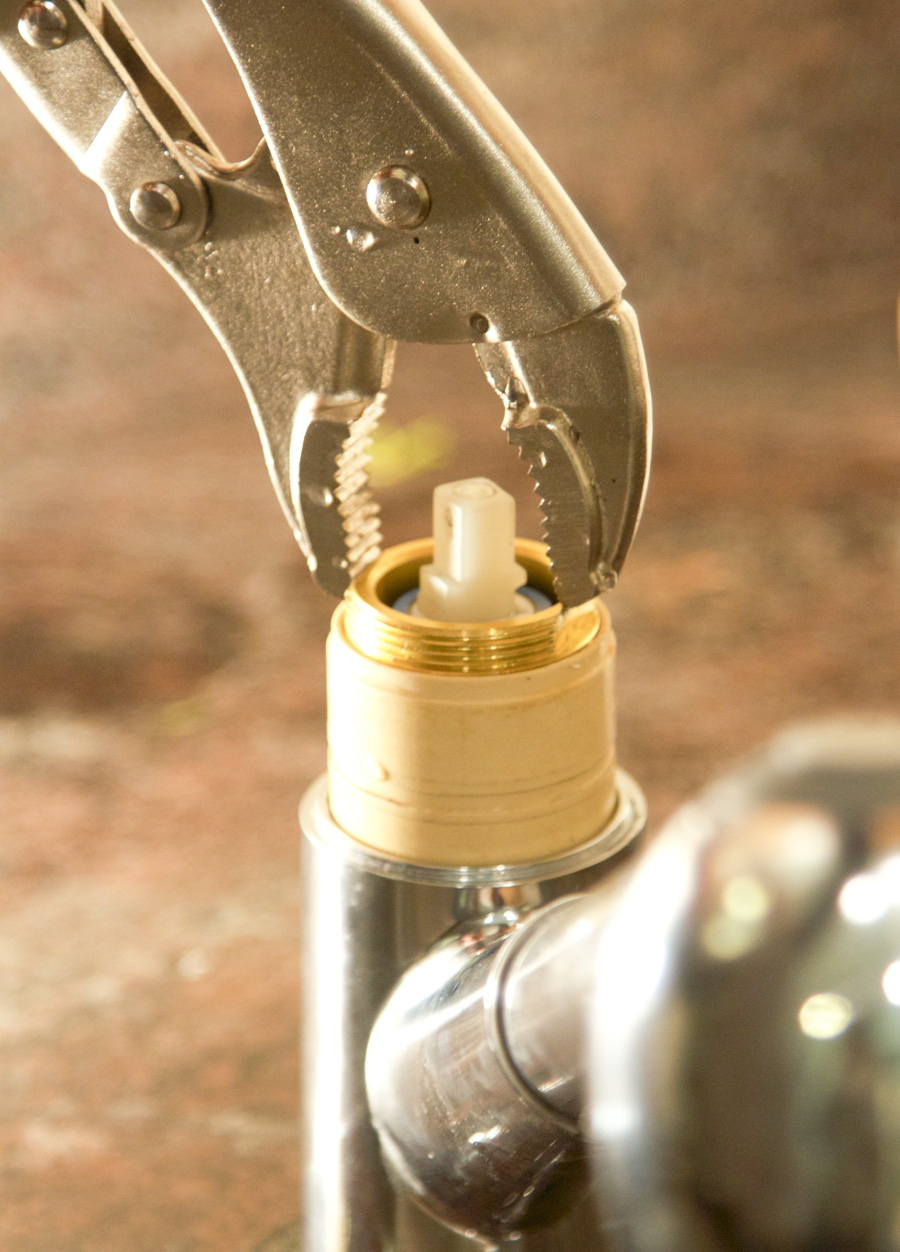
Step 6: Ensure cartridge is properly aligned

The rings on the bottom of the blue cartridge are supposed to line up with similar rings on the beige valve gasket, and the water flows through them. In our case, the gold retainer nut that was supposed to keep them aligned was not properly tightened down, so every time we turned the faucet handle we loosened the nut a little more and weakened the seal. Without a tight seal, the water was spraying inside the faucet and leaking down through the base. We found the leak!

Simple faucet fix that saved us $600

Step 7: Tighten it down

To fix it, Eli just lined up the cartridge with the valve gasket and tightened down the retainer nut to keep them in place. This took a little bit of adjusting – make it too tight and the handle is really hard to move, make it too loose and the sink will leak again. Eli got it just right, so the handle is harder to move than it was, but not so difficult that it's annoying.

Simple faucet fix that saved us $600

Step 8: Re-assemble the pieces

All that was left to do was put it back together...play that tape in reverse! He layered on the cap and handle, tightened the set screw with the allen wrench, and popped the hot-cold indicator back on. !moob-adab-gnib-adaB ...... Bada-bing-bada-boom! 

Simple faucet fix that saved us $600

Our sink is back in working order, our floors are safe, and our wallets are full. Well not full, but you know ... less empty than they would have been. Eli's penchant for taking apart things he knows nothing about really paid off! ;] 

Would you guys have risked it? Any other plumbing saves we should know about? 

Plans for the kitchen & dining area

Every time we finish a big project we like to take some time to breathe, enjoy the house being back in order, admire our handywork, and evaluate what we should tackle next. If I'm being honest, I'd say the lull between our last project and the next one is really 20 percent strategic, 20 percent day-job busyness and 60 percent exhaustion : ] I mentioned back when we were painting the kitchen cabinets that paint was just the first step – oooooh, was it – there is still a scary amount of work to be done. For instance, the second half of it on the opposite wall....

Here's the plan for the other side of the kitchen

Namely:

  • Install a tile backsplash (after choosing a tile, of course)
  • Install under-cabinet lighting
  • Build in the fridge, like this.
  • Create a pantry to the left of the fridge (again, like this)
  • Add lower cabinets on the right side of the fridge
  • Install a floating shelf or two above the new lower cabinets
  • Find an old, small island on casters so we can chop veggies without staring at the wall
  • Refinish the hardwood floors to eliminate the yellow
  • Spruce up the dining room with art and a rug (and remove the rug from the kitchen)
  • Convert the can light over the table to a chandelier

Next week I may ask for your help in choosing a tile backsplash, which is our next big to-do, but first a little inspiration for the dining room because a) that's much more relaxing to think about right now and b) you may need to see the vibes I'm striving for to choose the right tile next week! Since the first floor is essentially one long room, the kitchen, dining area and living room all need to relate to each other stylistically.

Here's the view of the kitchen from the living room

The dining area is a actually just a small segue between the kitchen and the living room. Currently its defining characteristics are a table and 4 chairs – pretty standard stuff. People only sit at the table when it's time to eat, but given its close proximity to the kitchen, it would be nice if it became more of a magnet for friends to congregate and socialize while dinner is being prepared (...y'all know I don't cook, but Eli does all the time).

Here's the view of the dining and living areas from the kitchen

As I said before, the first floor is open and small, so the rooms need to have a cohesive style. That doesn't mean everything needs to be color coordinated (though color palettes are your friend), but really the vibe just needs to feel consistent. When I walk through my front door I want to feel like I've arrived at my oasis on the coast, like if there were more open windows I could hear the waves crashing in the distance instead of sirens blaring through the city streets. An escape, if you will. "Beachy" can start to look kitschy real fast, so my plan is to temper it with modern accents and hits of black. 

A mood board of the beachy yet modern vibe I'm striving for in the dining area

1. Large Prism Chandelier | Shades of Light

There's a can light conveniently centered above the table that is just BEGGING for a dangly chandelier necklace. I'm convinced that converting it to hold a bold light fixture will really be the gamechanger – anchoring the table and making the dining area feel intentional. I love this black geometric chandelier for many reasons, but mostly because a) it's a bold contrast to all the white, b) it's funky, and c) it's airy enough that it won't obstruct the view from the kitchen to the living room.

2. Monterosso photo | Gray Malin

I'm obsessed with Gray Malin's photography, and I want to hang a really massive print like this one on the wall to the left of the table if you're looking at the last photo of the room. Unfortunately I am so far from being able to afford the size I want, so either this will show up on some future gift registry or I'll ask Eli to take a similarly gorgeous and relaxing beach shot on our next vacation.

3. Barnwood table |  Salt & Sundry

Salt & Sundry is another local go-to shop (will feature it soon), and this table was built by the shopowner's daddio in Cary, NC. It's rugged, rustic and petite, but easily seats 4 people. Plus, North Carolina holds a very special spot in my heart, making this table that much better. I bought this a couple months after moving in so we could stop eating on the couch.

4. White upholstered chairs 

I want to lighten up the table area by bringing in some fresh white chairs in an easily wipeable finish to complement the wooden ones I've already got. The ones seen here are from Dot & Bo for $350, which is about $300 more than I personally like to spend on a chair ; ] Sooo, I'll be hunting for a more affordable alternative.

5. Wood chairs | Persistent yard sale at 9th and K NE

The wood chairs were a discount find at a weirdly awesome yard sale in DC – weird only because it's open every day in some guy's front yard (I think his name is Reggie?) I paid $60 for the set of 4! The wood chairs + wood table is a lot of wood, but I kinda love it and the contrasting styles (mid-century and rustic). The white chairs and other accents will help to break it up.

6. Table runner, napkins, bowls | West Elm

This stuff is really easy to switch out whenever the mood strikes (or the season changes). I like this white and slate runner because it ties in with the black chandelier while still remaining easy breezy, and the napkins and bowls grab some of the coral from the beach umbrellas in the photo.

7. Area rug | Dot & Bo

An area rug is another one of those items (like the chandelier) that will help to ground & define the dining area. When choosing a rug, I'll be looking for something that's very easy to clean so the ravenous animals in the house (aka Eli & I) don't have to worry about stains from dropping food. I like the pattern of this imperial stamp rug (and that it ties in with the black accents), but it's probably too high maintenance in terms of cleaning so I'll be searching for something more food-proof.

8. Refinished floors

The persistent element on the first floor that makes me crazy is the yellow oak floors. So while this update is not specific to the dining area, I included it here so I can picture the whole transformation in my head and reassure myself that the floors won't be yellow forever. (A change gon' come!) Refinishing the floors is going to be a whole big process, which is why we haven't done it yet, but I think the house will look so much better once it's done. I haven't decided on a stain yet, but I like this dark walnut color. The darker floors might tip the balance between the wood table and wood chairs to "Whoa, that's a lotta wood!" so the rug will be important for breaking up the lumber show.

I'm excited to have this mood board for the room as my road map to a beach oasis in the city, but most of the stuff there is way more than I can afford right now. I'll be searching for similar pieces that fit into the plan at a price I can stomach. Rest assured, I will update you when I find them! 

Happy Friday, friends! All this beach talk has me itchin' for a vacation before the summer is over. Anyone else escaping to the coast?

How To Paint Your Kitchen Cabinets

Painting the kitchen cabinets was one of those projects that’s been on my to-do list since we first stepped foot in the house. I guess to some people (Eli, my family, and coworkers – y'know, just to name a few) painting new cabinets sounds silly. Yes, they’re in perfect condition. Yes, the shaker style is modern. Yes, the color of the cabinets "goes with the floors" (OMG, do you think that’s why they chose this floor stain?!)  

Our oak-filled kitchen right before we moved in.

Sorry, back to what I was saying – the cabinets were fine; the oak was just crampin’ mah style. All the wood felt very dark and heavy in a kitchen with zero natural light. I spent weeks – nay, MONTHS – showing Eli pictures of white kitchens on Pinterest (which was thrilling for him, obviously). I was trying to prove it was worth the effort, but instead I proved that natural sunlight beaming on countertops always looks lovely -__-  Do you know how hard it is to find a windowless kitchen on Pinterest for fair comparison?! It’s an exercise in futility. You could turn it into a game if you're really bored, but the judge has to be a photographer who can spot the window cropped out of the frame because there is always a window out of frame. I believe this one and that one are the only kitchens I ever found…

Nevertheless, I eventually made my case and one Saturday morning not so long ago we got to work. If you're following along on Instagram than you already knew this! I selected a bright white from Benjamin Moore called Chantilly Lace for the upper cabinets and a light gray called Nightengale for the lowers to complement our dark purplish/blackish countertops. I thought white would be too stark butting up to the counters and gray would be too dark on top – so two colors it was! In any other house I would opt for a much deeper gray on bottom for higher contrast, but with our space I worried a dark gray would totally dominate the small first floor. In retrospect, I probably could have gone a shade deeper, but don’t tell Eli I said so! ;)

Paint alone made a huge difference in the kitchen

The space feels much brighter and bigger now! Of course, paint was just the first step so this isn't a true "After" photo. We plan to add tile backsplash, under cabinet lighting, refinish the floors, and the fridge wall still has big transformations coming its way, too!

But as kitchen renovations go, painting the cabinets is the biggest bang for your buck. At less than $300 it wasn’t chump change like I thought it would be, but it was way more palatable than the thousands of dollars typically sunk into kitchen renos. Honestly it would have been cheaper had I not spent almost $50 on paint samples just to decide the colors and then when I chose 2 colors having to double supplies like paint, rollers, and trays.

I could type all day about choosing the right grit for your doors and the wipeability of semi-gloss vs. satin finishes, but wouldn't a how-to video be so much more fun? Take a gander, and I'll include some more details at the bottom of the post for the book worms in the house.

Yes, "If you like the video, like it." Gah – Newbie on camera alert! I meant like it on my new Youtube channel! If you need me I'll be spending the foreseeable future doing Ron Burgandy vocal exercises and practicing my non-regional diction. Huge thanks to my (literal) homeboy Eli for putting together the video! 

If you're still dying for more details, here's a supply list and some tips not mentioned in the video. Feel free to ask questions in the comment section, and I'll do my best to answer them!

Here’s what we used:

Supplies you'll need for painting your kitchen cabinets
  • Power drill
  • Orbital hand sander ($60) & detail hand sander (had this already)
  • 220 grit paper for the hand sanders 
  • 80 grit and 220 grit sanding blocks – $4 each
  • Liquid Sanding Deglosser – $7
  • Plastic Tarp & painter's tape to quarantine the kitchen – $10
  • Tarp zipper (optional splurge) – $10
  • Builders paper or dropcloth for the floor – $11
  •  1 gallon of Zinsser Bulls Eye 1-2-3 Water-Based Primer (only used half the can) – $20
  •  1 gallon of Benjamin Moore Advance semi-gloss paint in Chantilly Lace (only needed half a gallon but store was out of quart cans, so they gave me the contractor discount) – $43
  • 1 gallon of Benjamin Moore Advance semi-gloss paint in Nightengale (again, only needed half a gallon) – $43
  • 2” angled brush (one for each us) – $7 each
  • 4” paint roller (one for each us) – $5 each
  • 4” foam rollers (we went through 12, and I’m still kicking myself for using woven instead of foam) – $3 each
  • Mini paint trays (we went through 6) – $2 each

Some tips we picked up during this DIY: 

  • Number your doors and hardware

We numbered our doors and drawer fronts in the hole left by removing the hardware and preserved the label with painters tape. Then we drew a quick-n-dirty reference map of the kitchen to keep track of what went where. We also collected the hardware for each cabinet in its own baggie labeled with the corresponding number. 

  • Careful with the tape

We put down builder paper to protect the floors and put up a tarp wall to protect the living room, but the tape (both painters and gaffers)  ripped up bits of the floor finish here and there. How ironic, right? Weirdo that I am, I was actually happy about this because i think it means sanding will be easy when we go to refinish the floors!

  • Use a sander that hooks up to a vaccum

The orbital sander is the bomb. It's faster and more effective than the mouse hand sander, but arguably it's best feature is that it hooks up to a shop-vac to minimize dust. That was half the reason I got a second sander because I knew we'd have a huge mess on our hands. If you do get the orbital sander, I'd recommend practicing with it on a big wood scrap or something you don't care about before sanding anything precious. I bought it minutes before we started this project and was terrified of ruining the cabinets, so I stuck with the sander I knew and let Eli handle the orbital.

  • Keep an eye on the door edges

Any excess paint around the edge of a door can turn into a drip that adheres the door to the builder paper. There were a couple instances where we had to do touchup sanding and painting because of this.

  • Give yourself time and use thin layers

Painting your cabinets is a lot like painting your nails. Thin coats and adequate drying time are really the secret. This whole project took us 7 days, but we should have allotted 9. We painted one coat per day (prime front, prime back, 1st coat of paint on front, 2nd coat of paint on front, 1st coat of paint on back, 2nd coat of paint on back), but the fronts really needed 36 to 48 hours to cure before flipping them over to do the backs. Because we rushed it, the paper stuck to the paint in a couple places and we had to touch it up. Also keep in mind that we saved a bunch of time and effort by sticking with the same hardware and painting our cabinets while they were still in perfect condition. These two conditions meant we didn't have to fill in holes with wood filler or deal with the anxiety of drilling new holes in freshly painted cabinets. 

Anything else you want to know? Leave me a question in the comments below! And if you paint your cabinets I'd love to see them – just tag them as #CabinetRefresh!  

There's still a lot to do in this room, but it feels so good to finally cross this big project off my list! What do you guys think I should do for the tile backsplash? And I'm all ears on suggestions for floor stains! I'm considering options all over the board, from dark brown to white wash and even gray. Lay it on me!