DIY Record Player Shelf Extension

DIY Record Player Shelf Extension via Little House Big City

You know you're a hipster when you build a shelf for the express purpose of displaying your record player. You heard right – we officially joined the club a few months ago when Eli got this really awesome turntable for my birthday. We’re still waiting for our membership cards to arrive in the mail….should be here any day now. 

In case you haven’t heard the news, CDs and iPods are out and vinyl is back with a vengeance. No, really. Machines that were once used to produce CDs are now being converted to produce vinyl, and even still there are less than 20 vinyl presses operating in the U.S. In fact, one small shop outside of Prague wisely held onto its machines from the 60s and is now the world’s biggest producer of vinyl records. There’s a little trivia for your Friday afternoon. Tuck that away til your next encounter with a hipster when you can whip it out and amaze them with your brilliant intellect ;)

DIY Record player shelf extension via Little House Big City

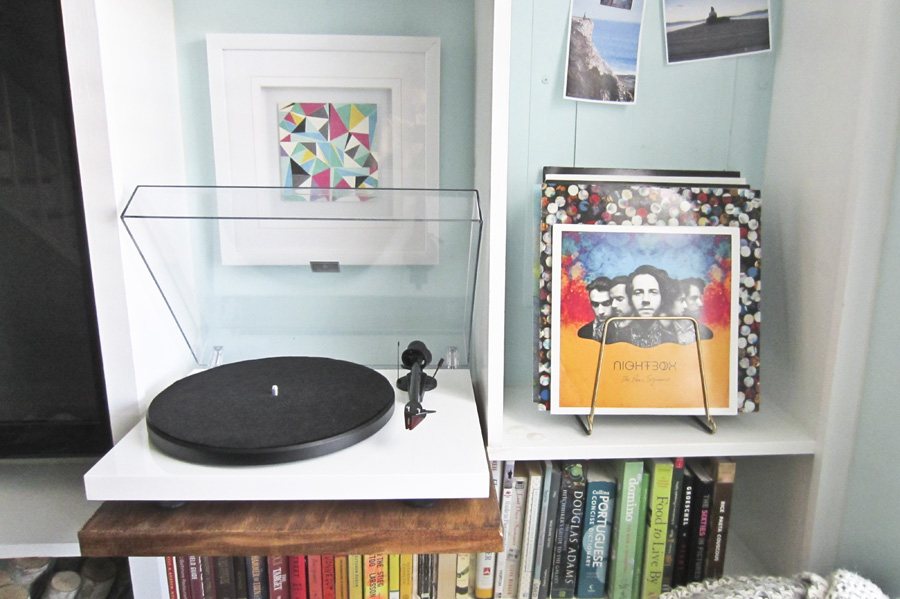
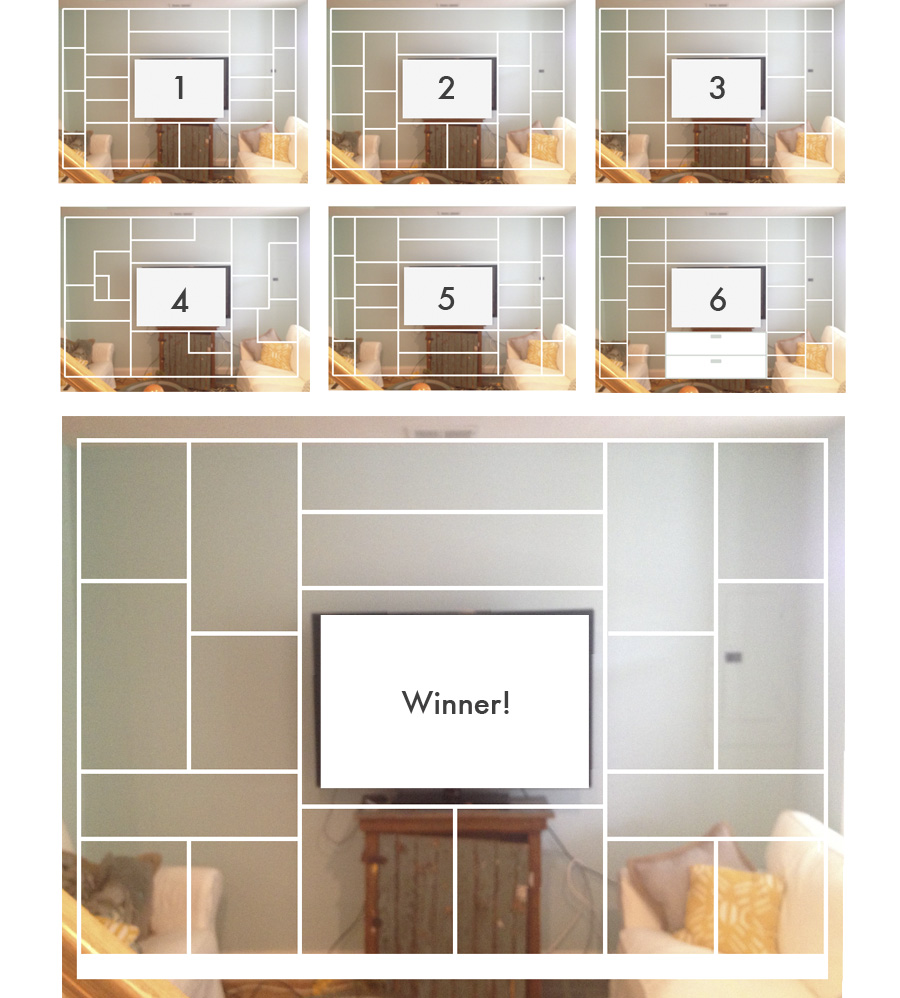
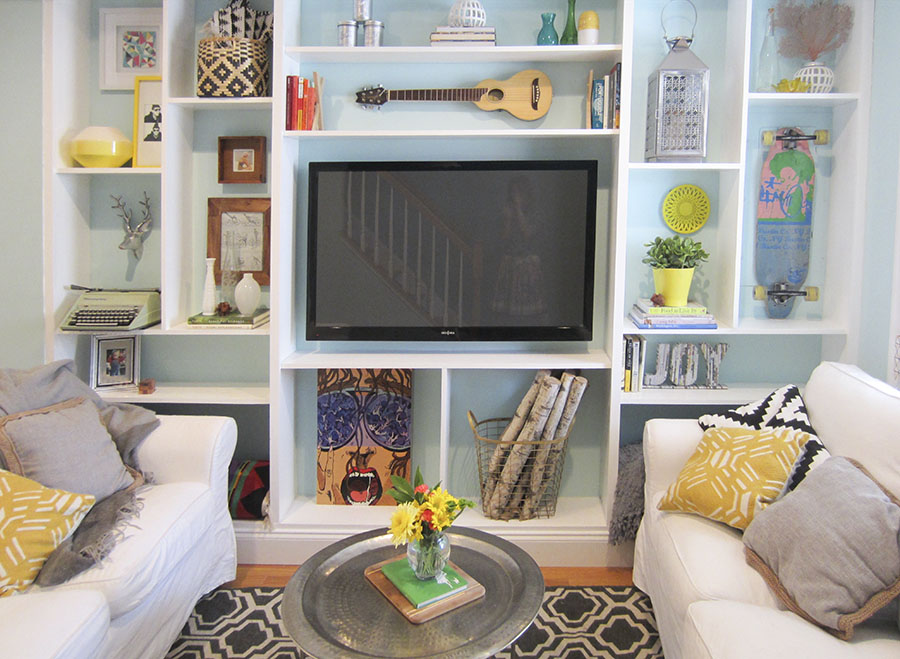
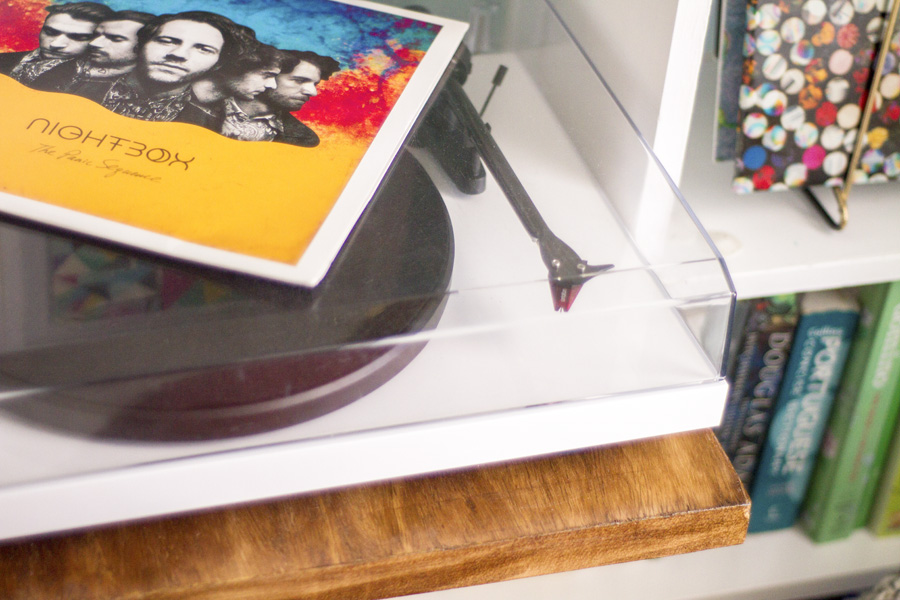
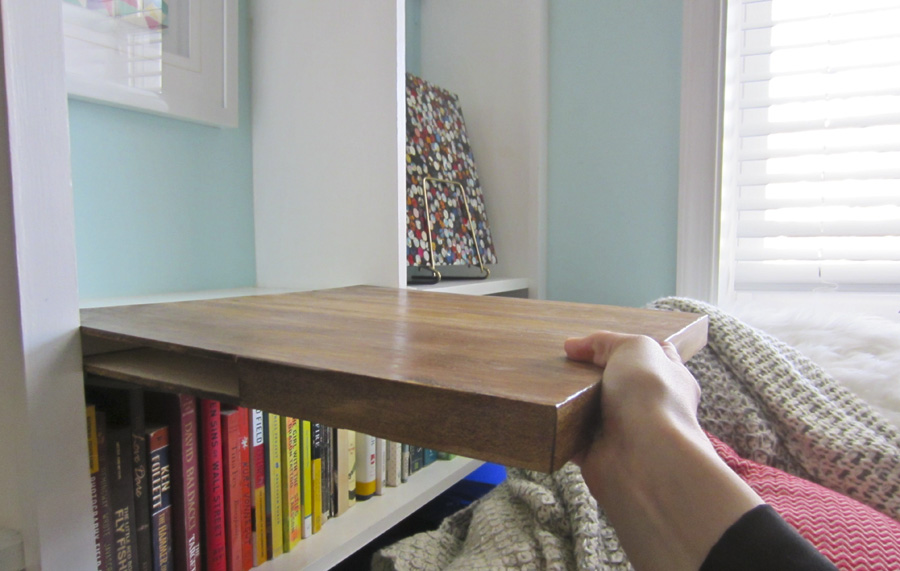
We knew we wanted our new music machine in the main living space because we love listening to tunes while cooking and entertaining – both downstairs activities. In theory, the built-ins seemed like the ideal spot, what with being our media center and keeper of all Eli's speakers, but in reality they’re about 6 inches too shallow to hold a record player. Normally this is where I’d go all *sad trombone* on you, but I refused and instead built a shelf extension. It’s a sleek wooden sleeve that slides onto the front of the bookcase to add several crucial inches of depth without leaving a mark. And while it’s not ideal to have something jutting out from the built-ins, this non-permanent, non-destructive, totally-reversible solution was just the ticket!

DIY Record player shelf extension via Little House Big City

Here’s what I used to build it:

  • scrap piece of 1 in x 10 in
  • 1 project panel of  1/4 in x 2 ft. x 4 ft sanded plywood
  • 1 roll of iron-on wood veneer – 2 in x 8 ft white birch 
  • Wood glue
  • Wood filler
  • Spackling knife
  • C clamps
  • Exacto knife
  • Sandpaper – rough grit & fine grit
  • Wood stain – test pot of Minwax Honey and test pot of Minwax Special Walnut
  • Rubber gloves 
  • Paint brush
  • Water-based polyurethane 
  • Paper towels
  • Clothes iron
  • Tin foil

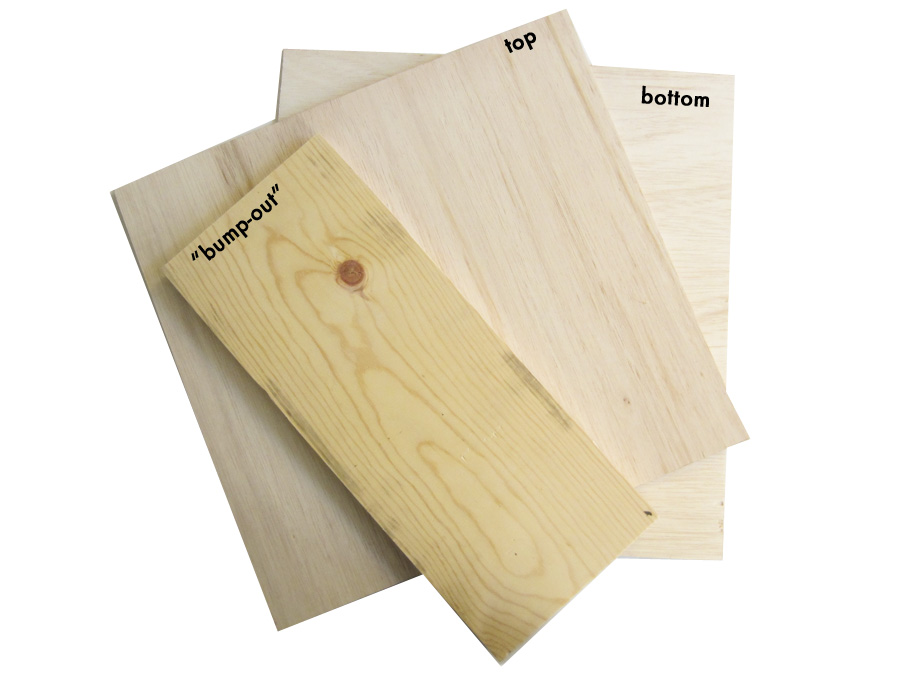
That seems like a lot of supplies, but we had most of them already, and the design is super simple. It’s just 2 pieces of wood slightly bigger than the base of the record player, sandwiched around a third piece of wood that will actually "bump-out" from the existing shelf. Here’s how I made it.

Step 1: Measure the existing shelf and the record player

The space I had to work with was a little more than 17 inches wide and 9.25 inches deep. The width was fine for my ~16 inch wide record player, but I needed at least 4 more inches in depth to fit the base of the player, plus an extra few extra inches to comfortably open and close the dust cover. All things considered, my new shelf needed to be 17 inches wide and 16 inches deep (9.25" existing + 4" bump out + 2.75" wiggle room). I drew these new measurements on my plywood twice – once for the top piece and once for the bottom. For the bump out, I used a scrap piece of 1 x 10 leftover from our built-ins project, and marked my cuts so it would be 17 inches long and 7.25 inches deep (the difference between the existing shelf and the new shelf). 

It was important for the thickness of the bump-out wood to match that of the existing shelf so that the "sandwich buns" on top & bottom would fit snugly and hold the extension in place. 

DIY Record Player Shelf Extension via Little House Big City

Step 2: Cut the wood to size

I used my circular saw to cut everything down to size, though a table saw would have been ideal. I cut as precisely as I could so the edges would line up when I stacked the pieces together, but it was a little tricky with the circular saw and fading daylight, so I figured out a way to handle it later.

Step 3: Assemble the pieces with wood glue

Rather than put nail holes in my shelf I opted to hold it all together with some serious Gorilla Wood Glue. I started by applying wood glue to the inside of bottom shelf where the bump-out would go and then carefully lining up the bump-out piece so the edges squared up nicely.

DIY Record Player Shelf Extension via Little House Big City

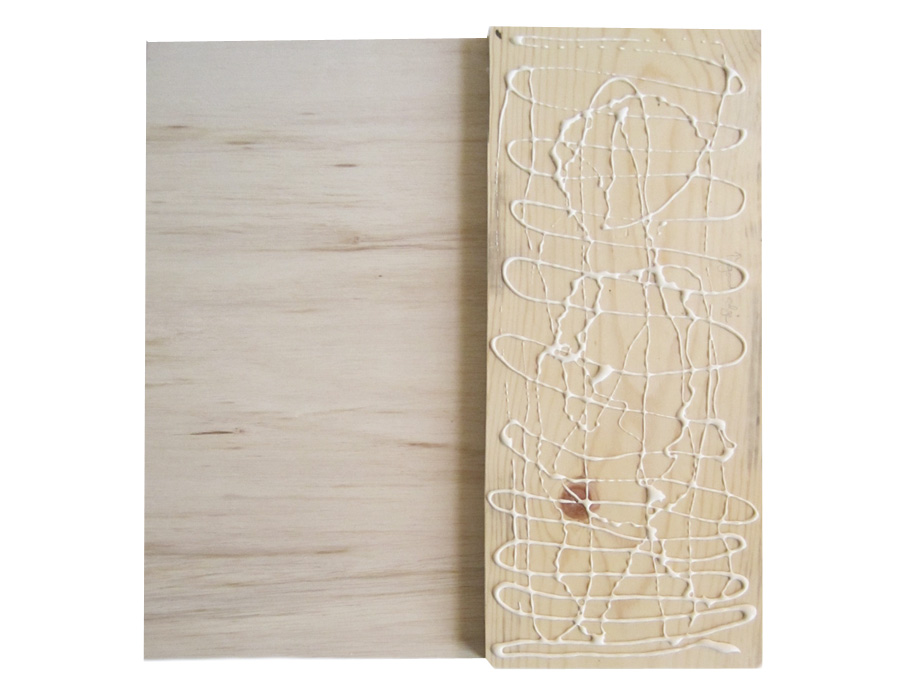
I pressed down on the bump-out and wiped up the excess glue that oozed out the sides before applying more glue & securing the top piece. It was basically like making a triple decker mayo sandwich, except simultaneously less delicious & more awesome. I used a lot of glue to get a really strong hold but I was careful not to get it on ANYTHING that would be visible in the final product. That’s actually a lie – the first time I made this shelf I was not careful with the glue cleanup and learned the hard way that Gorilla Wood Glue isn’t stainable. Imagine my deep dismay when I thought I was almost done and then my first coat of stain revealed giant, hideous blotches. It looked so bad I had to start over. So take it from me & my mulligan – don’t get glue on anywhere that you're gonna see later! 

Step 4: Clamp it together

After the pieces are assembled and the edges are neatly aligned, the shelf needs to be clamped together while the glue dries. It was at this point the first time around that I learned another lesson from the school of hard knocks – protect the plywood! It’s a relatively soft wood, and the clamps leave circular craters if pressed directly into it. On my do-over I slid in some long strips of scrap wood and a flat metal square to shield the wood. Worked like a charm.

DIY Record Player Shelf Extension via Little House Big City

While clamping everything down, more glue oozed out, so I kept a paper towel handy to wipe it up carefully. Then I let it all dry for a good 24 hours before removing the clamps.

Step 5: Smooth out the edges and apply the veneer 

If I wanted a more industrial look I could have stopped there, with the raw wood and the rough, layered edges. But I was going for polish, so I decided to apply a wood veneer to cover them up. Iron-on veneer is one of my new favorite things, and I'm brainstorming new projects just so I can use it again! It’s nicely finished wood that comes in a roll like ribbon, and it has glue backing that’s activated by heat. It adheres best to a very flat surface, so I needed to address the imperfect cuts I made in step 2 that left me with some slight gaps and juts.

DIY Record Player Shelf Extension via Little House Big City

To do that I used wood filler. I like using the pinkish/purple kinds that dry white because they're both fun to look at and keep me from trying to sand it down before it's ready. After it dried I gave it a quick once over with a fine grit paper and then wiped off the dust.

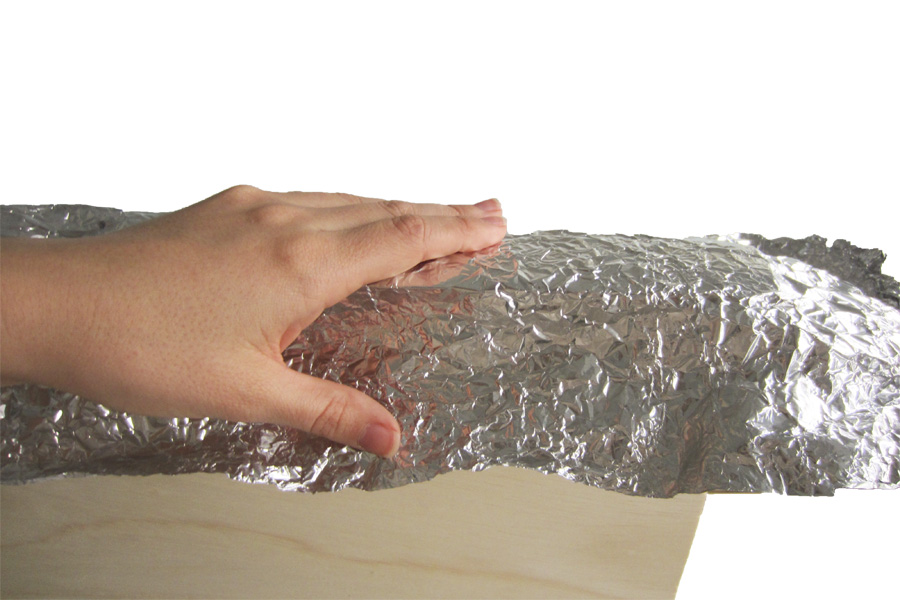
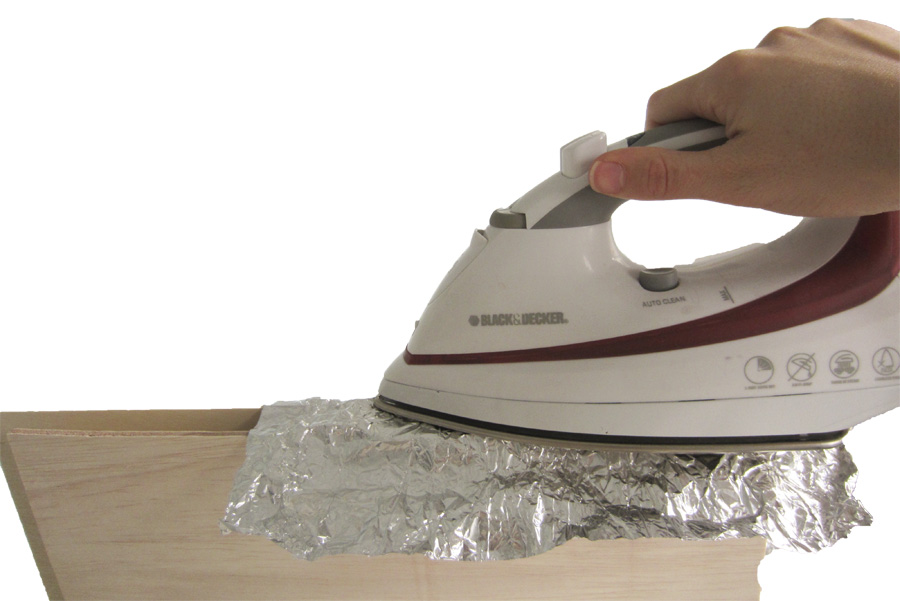
Then I cut 3 strips of veneer to length with scissors, keeping in mind that it was only supposed to cover the edges where the scrap bump-out was visible. I laid out my first piece, covered it with with tin foil, and then ran a hot iron over it for several minutes until it was clearly stuck on. The tin foil bit was a suggestion from the veneer manufacturer to protect the iron from glue, but I’m not sure it was entirely necessary.

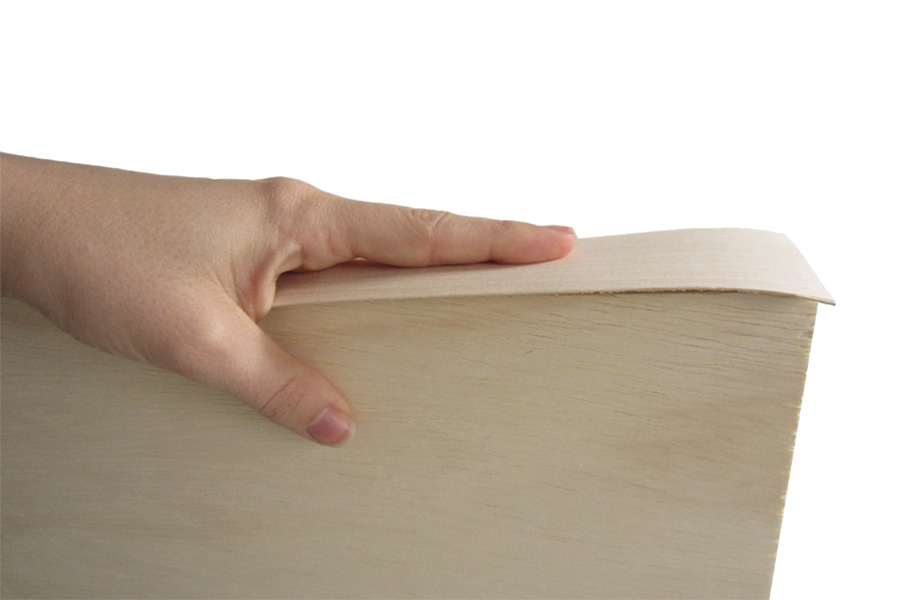
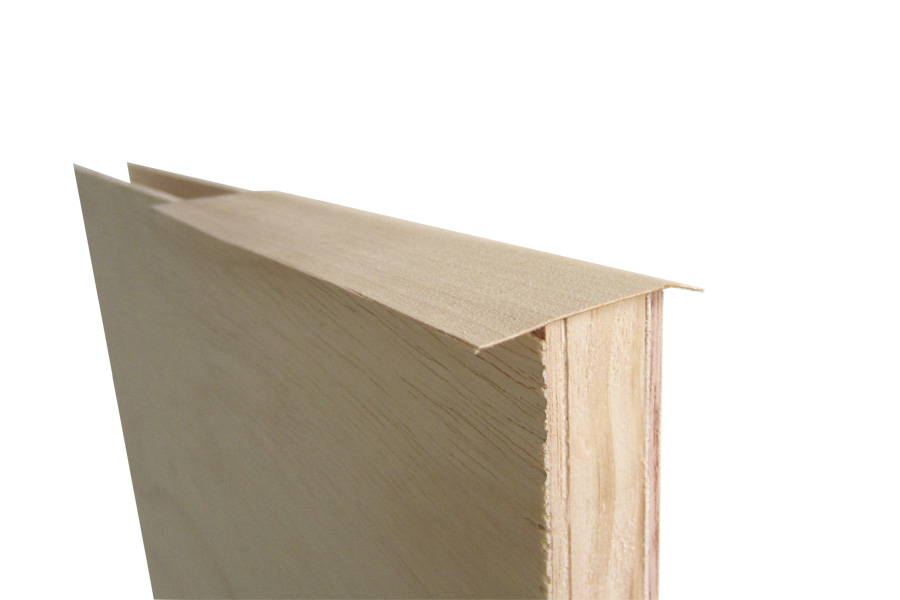
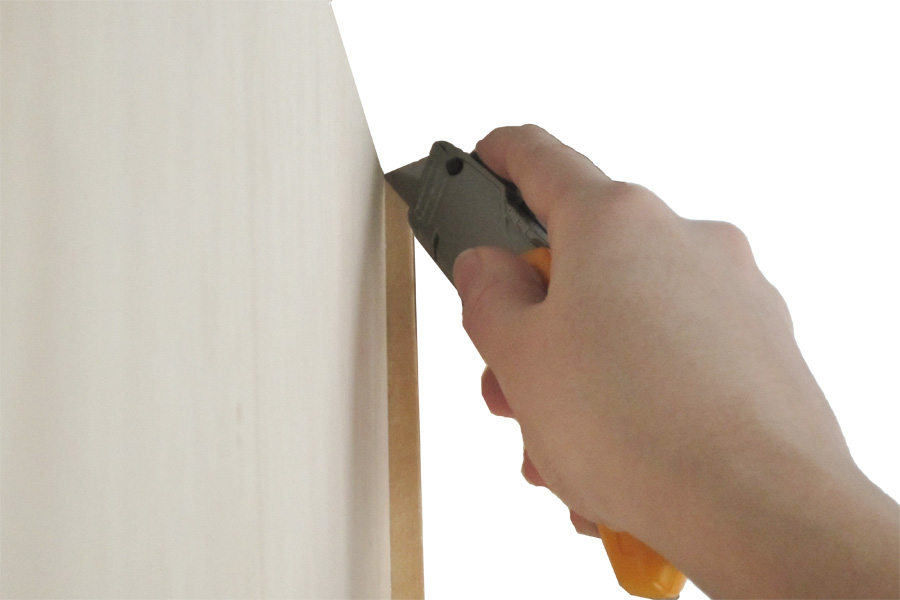
My veneer was thicker than my edges, but I waited til it was on and dry to cut it down to size with an exacto knife. That gave me some leeway with placement, but it also meant I needed to finish one side before moving onto the next one. That way I could make sure my corners matched up nicely...it took a little longer but the payoff was worth it.

Step 6: Sand, stain and finish

I lightly sanded the whole thing with a rougher grit paper to smooth everything out, and then with a fine grit to get it really smooth. It’s always a good idea to sand in the direction of the grain. Then I gave it a good wipe down with a damp paper towel and picked out my stain colors.

DIY Record Player Shelf Extension via Little House Big City

I used a combination of Minwax Honey & Special walnut to mimic the look of the acacia wood picture frames already hanging on the other side of the built-ins. My sanded plywood was clearly not acacia, so I got a little creative with my staining technique. I wiped on a light Honey base coat with a paper towel and then added the illusion of acacia intrigue with swoops of Special Walnut.

DIY Record Player Shelf Extension via Little House Big City

DIY Record Player Shelf Extension via Little House Big City

The stain was oil-based and the poly I had on hand was water-based. It’s totally fine to use them together as long as you allow extra drying time for the stain, which basically meant forgetting about the project for a couple days. Done and done. When I found a spare hour a few days later, I started applying the “finish”-ing touches. I gave it three coats of water-based poly, with a very light sanding in between the second and third coats.

DIY Record Player Shelf Extension via Little House Big City

After the last coat dried I sanded again with 440 grit, wiped off the dust, slid it into its new resting place, and admired my handiwork. The do-over was totally worth it. My lil record player has a happy home in the middle of all the action, where I can easily plug into our mega-loud speakers when it’s time to jam (sorry neighbors).

DIY Record player shelf extension via Little House Big City
Disclaimer: There's definitely some physics involved in this project, so please be mindful of the sturdiness of your existing shelf, the type of wood you're using, the amount of depth you're trying to add, and the weight of whatever you're trying to store on the shelf extension. The details in this tutorial are simply what worked for me. 

DIY Custom Built-In Bookcases

Constructing custom built-in bookcases

When I first launched the blog & a home tour, the project everyone seemed most interested in was the built-in bookcases. I planned to make it one of my first posts and it was no doubt going to rocket me into superBlogdom ;) Yet here we are, 8 months later and still no built-ins -- or superBlogdom, for that matter! Please, please, please forgive me for testing your patience, friends. It’s now been almost a year and a half since we built the shelves – they're twice as old as the blog –  and while I could have sworn we documented every step of the process, most of those photos are no where to be found.... excuse me while I find a corner to cry in.

A handful of photos were miraculously recovered from the ether, and they will have to do. Really the process of designing, planning and building could be split over 2 posts but I like to test the limits of your attention span (plus I simply don't have enough photos to justify more than 1 post). So get excited guys! Lots of words and few photos – I hope you've had your coffee! ;) 

First lets take a look at where we started:

Constructing Custom Built-In Bookcases

We knew the living room was going to be tricky before we bought the house. Eli had a huge TV, and we had a not-huge living room to hide it in. We considered a lot of options but ultimately decided it should go on the only full wall available. That wall was also the only one that could fit a full-size couch but priorities, people! TV > couch. I spent a few weeks looking for a midcentury-style credenza to swap in place of that clearly too-small cabinet, but all the ones I found were too long, too deep or too expensive. Sooo I gave up on that idea and set my heart on custom shelves. Naturally.

Step 1: Design & Plan

I came up with the design by snappin’ an iPhone pic of the wall and bringing it into Adobe Illustrator, where I spend most of my days. I started drawing shelving designs over the picture until something stuck. There were a few fixtures to work around: the TV (obviously), the circuit breaker box (to the right), a vent (top, middle) and a couple electrical outlets. I also figured having lots of different sized areas to fill would give me more options for what to put in them and look a little different from what I've seen on pinterest. More on that in a later post.

Designing and constructing custom built-in bookcases

What really sold me on this configuration were the double-wide horizontal cubbies (for lack of a better word) on either side of the TV. They're about even with the sofa arms (more-so in real life), and I envisioned them to serve as end tables since the room is otherwise too narrow for such luxuries. The cubbies themselves are tall enough to comfortably accommodate just about any drinking vessel you might choose... except maybe a wine bottle but get a glass for crying out loud! ;)

So once I settled on this design I measured the wall, measured my fixtures, and did the math to figure out the actual dimensions of my drawing. In other words, I found it easiest to work backwards. From those measurements, we created a lumber list. We pulled up Home Depot’s website to see what our options were and which lengths were most cost effective, and then did more math to figure out how to minimize waste. I was basically Russell Crowe in A Beautiful Mind. I color-coded my sketch by the length of wood that shelf would come from, and it served as our reference throughout the process. If we cut from a 6 foot board when we were supposed to cut from a 12 foot, we’d be left with an unusable amount of scrap and have to go back to the store for more wood. Ya dig?

Designing and building custom built-in shelves

Step 2: Shop

Ultimately we settled on this shopping list: 

  • Seven 1" x 10" x 12' - I think we went with pine
  • One 1" x 10" x 10'
  • One 1" x 10" x 6'
  • Two 2" x 4" x 12' - This is what I wrote down at the time but I'm seriously doubting we needed that much
  • One 12' piece of base molding
  • Two  1" x 2" x 12' piece of pine trim
  • One 1" x 2" x 8' piece of pine trim
  • Two packs of 2" phillips flat head wood screws 
  • One pack of 1.5" finishing nails
  • Wood filler
  • White, paintable caulk
  • 1 gallon and 1 quart of Zinsser Bullseye Primer
  • 2 gallons of Behr Premium Ultra Pure White in Semi-Gloss finish
  • Angled paint brush
  • Small paint rollers

Other than the 2x4s, all the boards were 10” wide (really 9.75”). That worked great for us because the shelves butt up against a wall that juts out 10.25”. After adding the 3/4” thick trim to the shelf fronts, we’d have a pretty smooth transition from shelving to wall. When shopping for lumber we looked for straight boards that didn’t have cracks, holes or tons of knots. To check straightness, we’d bring a board down to the floor, lift one side up to eye level, and squint while looking down the board and rotating it to check every side. If it bowed or had a damaged edge we put it back and grabbed another one. You’ll see in the pictures that the ones we chose weren’t perfect – there are higher quality options out there for a higher price. We went with paint grade, but you’d need a nicer quality if you wanted to stain them. 

We decided against renting a truck to bring the lumber home, so Eli’s station wagon & knotting skills really came in handy. Picture me terrified, clutching the boards from the passenger seat ready to use my she-woman strength at every bump turn and pothole, while insisting at least 10 times that "I should sit in the trunk to make sure they don't go anywhere." I'm sure all that "excitement" only shaved a few days off my life – a small price to pay to save a buck ;)

Constructing custom built-in bookcases

Before I go any further I should clarify – we are not carpenters. We had never built a legit piece of furniture before, let alone something this big, so we just took it slow and figured it out as we went along. I’m sure a pro would have done a better job but I didn't have a few grand laying around to find out. I’d read some tutorials (likes these here & here) and incorporated details from each to get to a final product that we’re mostly very happy with. There are things I would have done differently a second time around, as well as things I still plan to alter, but I’ll save those for the end. This is just one way to do tha dang thang.

Step 3: Construction

We started by building the outer frame and the full-length vertical boards on either side of the TV – these 6 boards form the supports for the rest of the design. We made our cuts on the back deck with a circular saw and did all of the assembly in the living room –  we didn’t want to risk the shelves not fitting through doorways or causing them to torque and break while navigating the house. We used a level, carpenter’s square and tape measure to make sure the boards were good to go before screwing them together. I held them in place while Eli used his countersinking bit to pre-drill the holes & then screwed them together. We pre-drilled everything to avoid splitting the wood.

Constructing custom built-in bookcases

I wanted to continue the base molding along the bottom, so the height of the shelves is actually measured from the top of the moulding to the ceiling. Then we created base supports out of 2 x 4s to hold them up. These risers are just rectangular blocks that we screwed together and spaced every 16 inches or so  (seen in the top left corner in the above photo).

Once we had the basic frame assembled we carefully slid it onto the supports against the wall to test the fit and breathed a huge sigh of relief when it did indeed fit. 

Constructing custom built-in shelving

Word to the wise: leave yourself a little bit of space width-wise so you can slide the shelves in & out without having to scrape against the walls. We hid that space later. After doing our first little victory dance of this saga we carefully laid the frame baaack on the floor to finish assembly.

 Constructing custom built-in bookcases

That's me marking the height for the "side table" shelves to fit all your beverage desires. We kept a level & square handy to check our shelves and corners often. 

Step 4: Patch & Sand

By the time we finished assembling there were a lot of screw holes to fill in, plus general imperfections in the wood that I wanted to hide. I'm fairly certain a carpenter would have created pocket holes to do the joining and then fill the holes with plugs, but that was beyond our skill set. 

I ignored everything on the outside of the frame since that would all be hidden against the wall, but all the visible holes got a good dose of Elmer’s wood filler applied with a putty knife. My wood filling photos are MIA, but that's probably for the best. Let’s just say I went totally overboard -- piling on the filler in big heaps & not scraping off the excess before letting it dry. Never again! That stuff turns rock hard, and the small mountains I created for myself were a huge pain in the ass to sand down.

Constructing custom built-in shelving

I used my B&D Mouse sander and went thru an entire pack of rough 80 grit plus another pack of fine 400 grit before it was silky smooth. By that time I'd also turned the downstairs into the Dust Bowl -- every surface was covered in a crazy thick film and it took forever to clean it all up. Next time I’d use less filler, scrape off all the excess while it’s still wet, quarantine the area with a plastic tarp like we did when painting the cabinets, and wear a sanding mask or respirator!

Step 5: Prime & Paint

Given all the dust, I was really careful about cleaning the shelves before cracking open a can of primer. I vacuumed, swept, wiped down with a wet cloth, and wiped down with a tack cloth before declaring the area dust-free. When everything was spick and span I laid down a drop cloth and got to “the easy part”… 

I foolishly thought 1 coat of primer and 2 coats of paint would be enough to get really even coverage but it took more like 2 coats of primer and FOUR coats of semigloss paint. Claw hands 4 lyfe.

I used an angled brush for the corners and a 6” roller for everything else. I did this before we moved the shelves into place so I wouldn’t have to worry about taping off or retouching the wall. 

After we were 100% sure everything was dry, it was time to put the shelves in their final resting place. We used a stud finder on the walls that would flank the shelves to figure out where we could anchor them in. Once we had a general idea of where they were we nervously shimmied the shelf to the wall, hoisted it up onto the 2x4 blocks, and secured it in place. We drove several screws thru the sides of the main frame and into the studs. In an abundance of caution we also used small L brackets to lock it to the back wall. This thing still feels super sturdy after 16 months but I haven't been using it as a jungle gym or anything. Of course, after locking it down we had a few more holes to patch and paint, but I was a pro by that time. 

Are you guys still awake? Pat yourself on the back and rest assured that you're almost to the end. The fun didn't stop there, guys! 

Step 6: Trim & Moulding

Walls are rarely perfectly level & we'd left ourselves some wiggle room to get the shelves into place, so there were small gaps here and there that we hid by installing 2” x 1” oak trim with finishing nails. Gaps be gone! I made a controversial decision to only install trim on the boards that ran full lengths… so the outside frame and the two vertical posts on either side of the TV. This gave those edges a nice beefy look, but now that we’ve lived with it like this for a while, I want to add trim to the rest. I'm getting the sense that the wimpy ones are envious of their beefcake neighbors. (Whether I actually get around to doing this is another matter) After the trim was in place, we installed base moulding along the bottom.

Constructing custom built-in-shelving

Step 7: Caulk & Touch-Ups

Caulk was the silent hero in getting the polished, built-in look. We caulked all the seams, edges and little nail holes left from attaching the trim & moulding, and then touched up the paint. It’s a good idea to actually paint over the caulk when it’s dry to make it easier to dust and clean down the line. Those gaps along the back wall in the picture above are suddenly gone in the picture below. Caulk is magic!

Constructing custom built-in shelving

And that's how we built the shelves! If you really want to know, there are a few things I would have done differently and a few things I plan to actually do something about.

What I’d do differently:

  • If we were to do this again I would have removed the base & shoe moulding from the walls behind the shelves. It was helpful to have the baseboards there because we rested the shelves on them while sliding the 2 x 4s in, but it also made it impossible to get a seamless transition from old to new base moulding. Luckily those corners are hidden by the couches, so it doesn’t bother me on a daily basis (just times like now where I’m revealing our folly to the world).
  • The vent above the shelves was inconveniently placed, so we ended up cutting a hole in the top board to accommodate it (fine) and cut a notch in the trim to go on top of it (mistake). We should have created some sort of extension for the vent to  nudge it closer to the wall and then used 1 complete piece of trim across the front to hide it altogether. Doh! Some day when we've fried our bigger fish we'll come back for this guy.
  • Think about what I wanted to put in the shelves. I took a Field of Dreams approach thinking all the pretty things I didn't yet have would find their way to our built-ins if I just built the things, but that has been more of a challenge than I thought. The cubbies below the TV, for instance, are an awkward size. I thought maybe some pretty baskets could sit there and hold extra blankets and pillows, but i's a pretty shallow shelf for a wide and tall basket. One thing I definitely plan to change is to add doors to at least some of the bottom cubbies...either those middle ones, or the outside ones, or both. I haven't decided the specifics yet, but it will happen!
  • Already said this but will say again -- trim on all edges! I liked the varied look at first, but now I wish they were all thick and substantial looking. Plus those trimmed edges just look smoother in person.

I think that's it. Like I said, they aren't perfect but we're very happy with them in general. At some point I'll finally get them styled to my liking and then really rejoice! What do you guys think? Would you consider building your own wall of shelves? 

Simple Faucet Fix That Saved Us $600 in Plumbing

Simple faucet fix that saved us $600

That sounds like the subject line of a spam email if I’ve ever seen one, but I swear it’s true! Back on the eve of Christmas Eve, Eli discovered water spilling out of the cabinet under the kitchen sink and onto our beautiful new floors...cue panic. Santa must have known this was *just* what we hoped for the night before we left town. There was no time to fix it, so we turned off the water supplies (to the sink and to the rest of the house), and we hoped for the best. When I got home about a week later, I found a plumber thru Angie's List who didn't charge the usual $75 or $100 to come give an estimate, and I thought, "Cha-ching!" In hindsight, this might have been a red flag. 

The plumber turned the water on aaaaand....nothing. No leak. Isn't that how it always goes? You've got a problem until you're standing in front of someone who can actually fix it? Ugh. After almost an hour of him "looking," I pulled a "mind if I take a peek?" and literally found the water in 30 seconds. Granted it wasn't a lot of water like it had been the week before, but I should have known at that point that he was a crappy plumber (pun intended). Regardless, I just wanted him to fix the sink so I could get the kitchen back to normal... that was until he said it would cost $630. *record player screech* Say whaat?!

He said we'd have to replace the faucet, and his quote included $255 for the one in his truck (not a great price, but whatever) and $375 FOR LABOR. Now, I'm no plumbing expert, but that sounded really high. Why so much for a simple faucet swap?

Simple faucet fix that saved us $600

Well, he complained a whole lot about our little corner sink and insisted on removing the garbage disposal to reach the faucet behind it and then reinstalling the disposal. No disrespect, but this sounded like a personal problem to me. A more nimble person could probably get in there fine without removing the disposal and inflating the price... like Eli nimble... 

(Please ignore the messy counters...leaky sink)

(Please ignore the messy counters...leaky sink)

I told the plumber, "thanks but no thanks," and that I would shop around for a cheaper, nicer-looking faucet. I mean honestly, if I have to replace a faucet that never bothered me to begin with, it sure as haayyyyl better be a stylin' upgrade! Plus, the leak had dissipated for whatever reason, so it didn't really qualify as an "emergency" anymore and could wait for Eli to take a look.

Now, let me stop for a moment to clarify – I'm not suggesting every plumbing problem is a DIY or that plumbers aren't worth the money they cost. We hired a plumber the first month we lived here because water was leaking from the upstairs shower and coming through the recessed lighting in the kitchen. We paid a little more than $400 for a plumber to fix it, and it was money well-spent. What I AM saying is to trust your gut. If a plumber can't show you the problem and explain exactly what is causing the leak, or he gives an estimate that seems disproportionate to the size of the problem, OR you have nothing to lose by tinkering on your own, then you may want to consider telling that plumber to bugger off. You can call another one to get a second opinion or try to fix it yourself... we chose the latter and thank god we did. It was ridiculously simple AND free! Here's how Eli fixed it.

Step 1: Follow the water to find the source

The plumber guessed the leak was coming from a plastic piece that was not sold separately, thus the need for a new faucet. He was wrong. Eli keenly noticed a dark ring on the underside of the granite counters that looked a lot like water  – an indication that the problem was likely above the sink. Smarty pants. We had often noticed water around the faucet while doing dishes but assumed it was just from splashing. Not so! Upon closer look, Eli found some leakage at the seam where the handle rotates. Ding, ding, ding, ding, ding!

Simple faucet fix that saved us $600

Step 2: Turn off the water

Before we started dismantling the faucet we had to turn off the water using the knob under the sink. For a brief moment we considered skipping this step and transforming the kitchen into a slip'n slide. Maybe next time... ;)

Simple faucet fix that saved us $600

Step 3: Remove hot-cold indicator

Our faucet doesn't have any branding or insignia so I can't tell you with certainty who made it, but to disassemble it we first had to pry off the little indicator that says which way is hot and which way is cold. A flat screwdriver did the trick without scratching the finish.

Simple faucet fix that saved us $600

Step 4: Remove the handle

Eli used an allen wrench to loosen a set screw the lives inside that hole. Then he removed the handle and the cap it rests on.

Simple faucet fix that saved us $600

Step 5: Loosen retainer nut

He used a vice grip to unscrew the gold retainer nut, but a big adjustable wrench would have been better. The vice grip can easily chew up the threading, so he had to be careful with that. 

Simple faucet fix that saved us $600

The gold retainer nut is what holds the blue hot-cold cartridge in place. The cartridge is where hot water is mixed with cold to give you whatever temperature you're going for. We knew NONE OF THIS before taking everything apart – sinks are fascinating! 

Simple faucet fix that saved us $600

Step 6: Ensure cartridge is properly aligned

The rings on the bottom of the blue cartridge are supposed to line up with similar rings on the beige valve gasket, and the water flows through them. In our case, the gold retainer nut that was supposed to keep them aligned was not properly tightened down, so every time we turned the faucet handle we loosened the nut a little more and weakened the seal. Without a tight seal, the water was spraying inside the faucet and leaking down through the base. We found the leak!

Simple faucet fix that saved us $600

Step 7: Tighten it down

To fix it, Eli just lined up the cartridge with the valve gasket and tightened down the retainer nut to keep them in place. This took a little bit of adjusting – make it too tight and the handle is really hard to move, make it too loose and the sink will leak again. Eli got it just right, so the handle is harder to move than it was, but not so difficult that it's annoying.

Simple faucet fix that saved us $600

Step 8: Re-assemble the pieces

All that was left to do was put it back together...play that tape in reverse! He layered on the cap and handle, tightened the set screw with the allen wrench, and popped the hot-cold indicator back on. !moob-adab-gnib-adaB ...... Bada-bing-bada-boom! 

Simple faucet fix that saved us $600

Our sink is back in working order, our floors are safe, and our wallets are full. Well not full, but you know ... less empty than they would have been. Eli's penchant for taking apart things he knows nothing about really paid off! ;] 

Would you guys have risked it? Any other plumbing saves we should know about?