
When E & I shared less than 500 sq. ft. in our previous apartment, we quickly learned that a jacket on the bench, shoes in the living room, a stack of mail on the table and an empty glass on the desk were all it took for the place to feel like a wreck. Suddenly 500 square feet feels like 300 square feet, and everything is just a liiiiittle more irksome. If you’re in a bigger space, clutter doesn’t really feel like clutter because it’s not invading your line of sight and you can live in blissful ignorance as the stuff spreads out instead of up. ;)
…Well, we don’t have quite that much space. My definition of clutter has gotten a tiny bit more lenient now that we’re in a house, but order is still crucial to making our space feel – y’know – spacious. The first area to tackle was our landing zone – the place we turned to upon walking in the front door to unload all the mail we just carried in, in-cah-luding that latest issue of Rachael Ray.

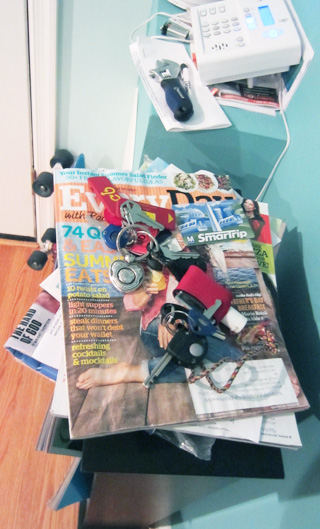
Beautiful. Just what you want to see when you come home! My landing zone, besides looking generally chaotic, was getting FULL UP with old issues of RR. I started subscribing on my mom’s recommendation a few years ago because I dread the grocery store and the idea of planning a meal every night, and frankly RR makes it easier. I will never ever claim to be an amazing cook – it just ain’t my bag. But if I diligently follow a recipe provided by a trusted professional, I’ve got a 50/50 shot of making something I’d actually want to eat. I should probably just invest in a single cookbook, but there are a handful of recipes in those issues that I’ve tried and succeeded at. So they basically comprise my entire cooking arsenal and now I can never throw them away!
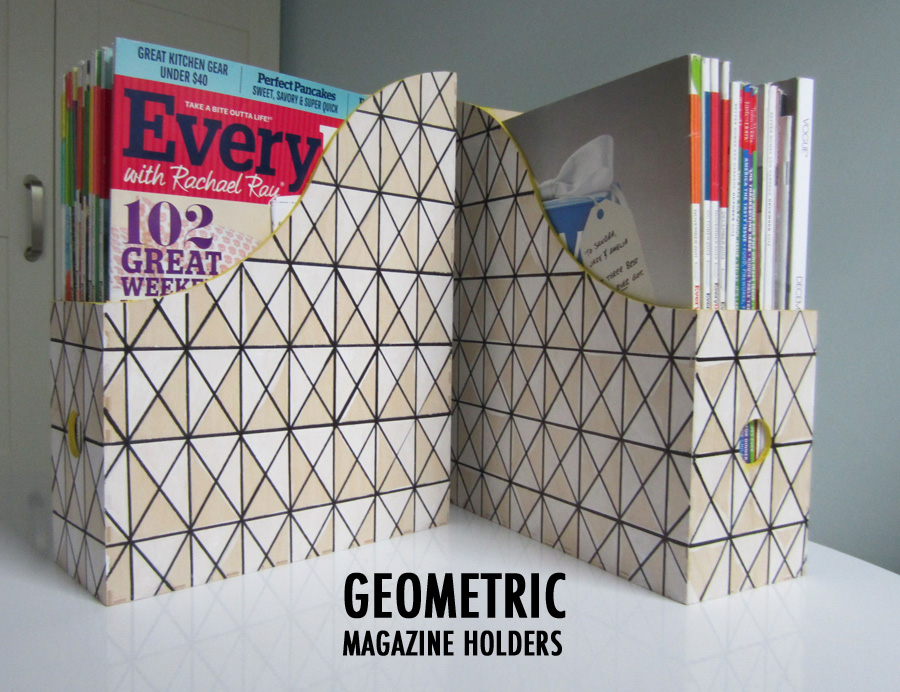
Instead I made these wooden geometric magazine holders to bring order to the mayhem – an Ikea Hack that cost less than $15 and maybe an hour to do. Totally worth it, everyone should do it.

WHAT YOU NEED
• KNUFF Magazine Files from Ikea – $10 for 2
• Craft paint (white & accent color) – $1.25 each
• Black Fine Tip Sharpie – 75 cents
• Ruler – 25 cents
• Small Paint brush – $2
• Pencil – 25 cents
Step 1: Draft horizontal guide lines
Use your ruler and a pencil to trace horizontal lines going around the file. I eyeballed the spacing to be about 1 ½” between each line, doing my best to keep my ruler level & my lines parallel. When moving on to a new side of the box, I would line up the ruler so it matched the lines on the side I just finished. That way the lines are consistent all the way around.

Step 2: Flip that ruler on its side and do it again!
Sort of. You could do the exact same thing horizontally, but then you would have squares. That wasn’t quite the look I was after, so I spaced my vertical lines about an inch apart. My ruler was coincidentally an inch wide (not actually a coincidence), so I was able to trace both edges of my ruler, scoot the ruler over an inch and do it again. Working my way around like this meant my pencil lines were all evenly spaced and parallel. Pow! Pow!
Step 3: Connect the dots
Instead of connecting the corners of each and every rectangle individually, you can connect the corners of a whole diagonal row at a time using your ruler. Don't be alarmed if they're not matching up perfectly every time. These are just your guide lines, they'll be covered up later.


Step 4: Paint your triangles
Next, use your paintbrush and white craft paint to start coloring in some triangles. I tried this out two different ways – first, I tried painting triangles that halved each rectangle and then I tried painting smaller triangles quartered each rectangle. I think I like the latter better, but the white is really subtle on the light wood, so the difference between the two is not all that drastic. I only used one coat of paint which gave it a very cool whitewash, two-tone wood look. I love the subtlety ("Subtlety" is a weird looking word). Don’t be too anal about painting inside the lines, it’s actually better to cover your pencil marks to create a sealed base for your black Sharpie to go over. Because the white is light, you can still clearly see your lines.


Step 5: Retrace your lines for real this time
After the paint dries (which took all of 10 minutes for me), use the ruler and pencil marks as your guide to retrace all the lines in Sharpie. Like I mentioned in the last step, it's best to draw over the dry paint. These holders are wooden, which makes them feel more substantial, but it turns out that Sharpie bleeds when you draw on wood. That's not a good look. So draw over your dry paint and delight in your crisp black lines.
Step 6: Move on to the next one
After I finished the first magazine holder, I laid the two next to each other and lined it up, so I could draw my lines in the same place. This way they pretty much appear to be one big file when pushed together.

Step 7: Trim it out with an accent color
I chose yellow, as I often do, but you can use whatever color you like. I washed out and dried my paint brush, and then used it to carefully line the exposed edges with yellow paint. I considered painting inside the file too, for an extra pop, but ultimately decided that was a risk I didn't want to take. It could have created a sticky surface for my precious mags.

That’s it! Fill them up with your own collection of RR – or Vogue or Vanity Fair or Rolling Stone or whatever you collect. I set up my new cooking library on the built-in shelves in the living room (a mere 10 feet from the kitchen). Eventually I’d like to have some floating shelves or an open-ended cabinet in the kitchen to set these on. That would be more logical and might encourage me to start cooking again. ;)
As for the big magazine rack, it’s sighing with relief that it’s no longer overrun with RR. It’s got a new home by my breakfast nook, where it has a frequently changing selection of lighter reading.


Sounds easy enough, right? For $15 and an hour of time, these puppies made a big difference.